August 31, 2010

New Header!

Today I decided that my blog header was a little dull.  It's time to pep things up a bit.  I really like how my Porch and Garden Party widget turned out.  The colors are perky with a hint of sophistication.  That doesn't exactly describe me, but I like the look.  Now my new header and widget have a matching background.  

New Header

The old header was way too sedate.  At the time I created it, I really liked it.  But looking back, it seems rather dull. Was I feeling dull?  Hmmm. Maybe I was. Yes.  I think so. 
Old Header

The change is good.  I feel perkier just looking at it.  The sophistication part hasn't kicked in yet. (Giggle)

I may tweak it some more soon.  Maybe I should use a color photo instead of the black and white.  Maybe I need to create a look that is more free-form.  That's not going to happen today.  I have things to do, places to go, and people to meet!  Because I am feeling perky!!!


Be sure to check out my Porch and Garden Party.  It's not too late to join in!

August 30, 2010

Delirious over Dishes

I went to several yard sales on Friday and Saturday.  This turned out to be The Dish Weekend.  People were getting rid of dishes.  Ordinarily, I would have admired these sets and left them to someone else. I don't need dishes.  Now that I have a booth, I bought them.

I have found a very pleasing side benefit to having a booth. It's sort of an adult version of playing house.  I am having so much fun playing with the pretty things I'm buying even though they aren't in my house.

As for the dishes, I am really looking forward to staging them.   I see so many elaborate and wonderful table settings at blog parties, but I don't generally do much in the way of tablescapes at home.  Now, I am finding myself really looking forward to setting up something elaborate.  The good part is, all my work will get to stay set up for a bit... until the dishes sell, that is.


These vintage beauties were the first set I found.  It's not a complete set - there are 5 dinner plates, 6 bowls, and 7 saucers or desserts.  Some of the designs are fading, which I found very endearing.  These are the dishes that came the closest to staying with me.  They are so lovely.  Oh dear.  I'm wavering.  I'm so tempted to bring them back home.

These 4 oval beauties were in the same same box.  I thought about keeping these, too.  I like to eat on smaller plates sometimes.  These would be such a treat to use!  I'm tempted to bring them back home, too, even if just for a little while. 


The dishes were all just sort of tossed in the box.  The price was so low that I didn't even count or inspect  the pieces.

On Saturday, on my way to the booth, I passed by a couple of yard sales and I just had to stop.  I'm so glad I did.

One of the yard sales seemed to be sort of an estate sale.  I think the man had inherited a lot of things that he just wanted to get out of his house.  Inheriting someone's household items can be overwhelming.  At a certain point, it no longer matters what something may actually be worth.  It just needs to be taken away.  He had two fabulous, but dusty, sets of dishes all piled in one very heavy box.  This Christmas set was in the box. 25 pieces all in perfect condition.

The dishes are trimmed in gold.


There was also one mismatched Christmas plate in the box, 'Tis The Season

Also in the box was this wonderful set.  35 pieces.  In perfect condition.  They have what looks like pink dogwoods around the border.  On the back, there's some Chinese markings.  I tried looking them up, but quickly realized it would be like finding a needle in a haystack.


There were also a few extra dishes in the box that didn't match.  These teacups and bowl had similar colors, but they were made in Japan and were more delicate.

I spent a lot of time washing dishes this weekend.  It was the most fun I've had doing dishes in a long time.  My kitchen looked crazy - dishes piled on every available spot.  Now they are all packed up and ready to be taken to the booth.  I'll put them in an out of the way spot for now, not caring if they sell right away.  We already have a fall-ish display on a table.  If the dishes are still around later, I'll stage them properly.  The pink set and the blue set would be most fun to feature towards the spring.  

What I'd really love, is to find a hutch (or two) to put in the booth.  If I'm going to keep coming across wonderful sets of dishes, I need a fun way to display them.  I'm doing some major positive thinking about this.  I'll find a deal on a hutch soon, don't you think?

Be sure to check out my Porch and Garden Party.  It's not too late to join!


I've joined the following link parties:
Garage Salen' Sundays at Debbiedoos - Be sure to take a look at her cute fall lampshade!
Sunday Scoop at I Heart Naptime
Thrift Share Monday at Apron Thrift Girl
Making the World Cuter Monday at Making the World Cuter
Weekly Treasures at Southern Hospitality


August 28, 2010

Shuffling Furniture

I spent all day Thursday shuffling 3 large pieces of furniture.  These are probably the 3 largest pieces of storage furniture in the house.  All three were loaded.  What a job!

The hutch went from the family room (where it shouldn't have been in the first place) to the pantry.  The Hoosier that was in the pantry went to the foyer nook.  The wardrobe that was in the foyer nook went to the family room.  All of these pieces function better and look better in their new spots.  It will take lots of tweaking and organizing to make each piece function and look right and in its new location.

The most important piece to get right was the hutch.  It's now holding lots of kitchen items.  I tried to gussy it up so that it can do it's job with as much flair as possible.

Here's the hutch in it's new home.  The cat in the photo is Dolly, who tries to spend most of her waking hours in the kitchen in case there's a treat to be had.

Before
This photo shows how pantry from before - when the Hoosier was there.  I'll show the Hoosier in it's new location soon.  I'm doing a small, but fun update.  It'll be ready soon.


Did you notice the sunflowers?  I bought some the other day for our wreath and this is what I did with the other bunch.  They look rather nice in my white yard sale pitcher.


There are a couple more details worth pointing out.  The hutch looked too white once everything was in place so I put a long piece of green Duck shelf liner on the top.  It's a fabulous green and adds a nice punch of color.

The Tonka truck is from my husband's collection.  I like to put tiny pumpkins in it around October, so I went ahead and put it on the shelf. 

The only money spent on this new setup was for the super cheap, on sale sunflowers.

I have a feeling that I'll tweak the hutch display often for seasonal and/or holiday looks.  I've already made a few changes since taking this photo.  And let me just say that I am not bowled over by the basket arrangement. I need to ponder this for awhile.

Be sure to check out my Porch and Garden Party.  It's not too late to join in!

I've joined in with the following parties:
Flaunt it Fridays at Chic on a Shoestring Decorating
Feature Yourself Friday at Fingerprints on the Fridge
Fab Friday at Frugal and Fabulous Design
Home and Family Fridays at Home is Where My Story Begins
Friday Make Mine Beautiful at It's a Blog Party ~ decorating ideas
It's a HodgePodge Friday at It's a HodgePodge Life
Show and Tell Friday at My Romantic Home
Frugal Friday at Shabby Nest
I'm Lovin' It Fridays at Tidy Mom

August 27, 2010

Sunflower Wreath and Porch & Garden Party #4

I am so glad August is nearly over. The dog days of August. Heat. Humidity. I am so over it. I'm ready for the crisp cool days of Fall.& I am so ready for it that I went out and bought cheap artificial sunflowers.


Truly I'm not a big fan of artificial flowers, but I totally went against that yesterday. I needed sunflowers. I needed a hint of fall in the air at my house, even if it wasn't the real thing.


The sunflowers were half off at Hobby Lobby. They came in bunches. I bought two bunches but only used one for this wreath. I'll show what I did with the rest in another post. My first project with the sunflowers was this wreath:


Before, the wreath was rather plain. I am embarrassed to say it spent all summer with a rather naked look. I like having a wreath that I can cheaply change the look by changing just the a few pieces.


I hung months ago thinking the naked look was temporary - just until I found something summery looking that would make it look wonderful. Next summer, someone remind me to hang something different. In the summer, I just don't get excited about wreathes.


Fall is a different story. I think there may be a law somewhere that a cottage must have a wreath (better yet, two or three) starting in the fall and lasting right through the holiday season.


I thought it would be rushing things a little too much to go with autumn leaves and pumpkins and so forth. But sunflowers are perfect for transitioning from summer to fall! I'm ready to transition - that's for sure!


The wreath is next to our side entrance.  One of these days I'll do something about that ugly bench, but for now, it's very useful and it doesn't horrify me enough to move it higher up on my to-do list.  Anyway, now that I have a sunflower wreath, I can easily ignore the bench.


Now that my wreath has a little autumn flavor, I'm starting to excited about bringing a bit of fall to the rest of the porch.  How about you? Have you been doing anything fun to your porch or garden? If so, please link up to my Porch and Garden Party!

But first, I have joined these fun parties:
100 Ideas Under $100 at Beyond the Picket Fence
Thrifty Thursday at Bloggeritaville
Strut your Stuff at Fireflies and Jelly Beans
Hooking Up With HOH at House of Hepworths
Transformation Thursdays at The Shabby Chic Cottage
Strut Your Stuff Thursday at Somewhat Simple


Now on to the Party!


August 25, 2010

Cork Shelf & Drawer Liners

Some of my projects don't turn out as I hope the first time around.  My kitchen drawers are a prime example.

First I lined them with the Rubbermaid rubber-y liner.  I found it in red and it was beautiful.  As long as we didn't open and close the drawers.  It doesn't stay in place.  I could have secured it down with hot glue or double sided tape, but I didn't want to.

Next, I made a dish drain cloth, which didn't look all that great as a dish drainer, but fit almost perfectly in a drawer and gave me a happy feeling every time I looked at it.
The mat is lined with terrycloth, which is nice. The fabric is a little busy for a drawer, but it's vintage from my grandmother.  This would have worked pretty well if it had been the exact size of the drawer.  The width was fine, but the front to back measurement was a bit off - not quite long enough.  I have to tug and pull it back to the front on a regular basis.  Not as often as with the Rubbermaid liner, but enough to annoy me. 

Yesterday, I installed option 3 - cork.  Cork is cushiony, absorbent and naturally resistant to mold and mildew.

My dear hubby ended up with some extra cork from some job in the past.  I had hoped to make a bulletin board out of something cool, but the size wasn't right and the cork has a few tears and creases.  But I'm having no trouble finding good pieces for shelves and liners.


I have finished one shelf and two drawers and am very pleased.

The main reason I decided to use cork was because last week as I was moving some coffee cups, I noticed a mildew-y area under one of the cups.  If I take the cups straight out of the dishwasher and put them away, they may not be completely dry.  Putting them right on a shelf is not a good idea.  ...unless the liner works well with moisture.  ...like cork.    I figure my glasses shelf would need the same protection.  I especially like the sound muffling properties of the cork.  The glasses don't clink as you set them in place.

Next, on to the drawers.  I started with the two that most annoy me.

My gadget drawer is looking good.  

I am going to make a minor change in this drawer.  I'm going to remove the large organizer on the left.  As much as I love organizers and bins, I think this drawer would function better without it.

Also, note - if you decide to use cork to line drawers or shelves, don't bother with adhesive backed cork which would likely be a mess to take back out in the future.  The plain cork will lie flat on it's own.  If it's been in a roll, it may need a day or two of being weighted down, but it will end up totally flat.

I will have to live with my cork liners for awhile before making a true judgment.  I did a bit of Googling on the subject and found random comments here and there where people had used cork to line their drawers for years and loved them.  Stay tuned for a few years and I'll let you know!

Don't forget to link to my latest Weekend Porch and Garden Party!


I have joined the following link parties:
Make It Yours Day at My Backyard Eden
Show and Tell at Blue Cricket Designs
Spotlight Yourself at It's So Very Cheri
Show Us What You're Workin' With at Me and My Bucket
Creative Share Wednesday at Trendy Treehouse ~ crafts, recipes, decor, gift ideas and more
Works for Me Wednesday at We Are That Family


I'll join these parties once they are posted:
Look What I Made at Creations by Kara
Be Inspired at Room to Inspire - not every week  
Idea Sharin' Wednesday at Women Who Do It All  
 

August 24, 2010

Wooden Ironing Board

Last week I found a fabulous wooden ironing board at an estate sale. I'll call this board #2 because I already have a vintage wooden ironing board (board #1).  What do I use board #1 for?  Ironing. 

My wooden ironing board - in the middle of the floor for some unknown reason

I bought a cute vintage looking cover for board #1 and blogged about it here.

Then I found some great inspiration ideas.  
There's nothing like a little inspiration to get you moving on a project!
There are lots of other uses for these vintage gems besides ironing.

Painted Ironing Board from The Hollow Fencepost

Used as a Potting Bench from  Playing in the Dirt
Used as a Side Table - Craigslist photo found on Flickr
Made into a steel guitar - from AQS Quilt News

Outdoor Wedding Decor from Casa Sugar
Painted Coat Hook from Folk Art By Donna;s Etsy Site
These aren't wood, but what a cute idea - cafe tables - from The Stir
Used as the bar at an outdoor party - from Country Living
Used as the dessert table at a Fall party - from Joyful Weddings and Events
Store Display from Jazzejunqueinc on Flickr
Porch Table  from My Southern Cottage
Painted in Tracey's fav robin's egg blue and Decoupaged at Notes from a Cottage Industry

By this point, I'm feeling inspired. I had been planning to put board #2 up for sale in my booth.  But on second thought, I should keep this and use it as a table in my laundry room!

The first thing to do is remove all the covers.  It turns out, this board had 10 - YES TEN!!! - covers over it.
I forgot to take a picture before I began.  This is when I'm down to the last 2 or 3 layers.

The oldest layers were nailed to the underside of the board. 


An hour or so later, I pulled out the last nail.  Time for the big reveal.  How will the top of the board look?  I hope it's in good shape.  Drum roll please.

Oh my.  Oh me, oh my.  I have a real mix of emotions here.  This is the original sticker that came with the board.  The whole sticker is there.  You just don't see that very often. So why am I also let down?  Because now I don't think I should keep it.  I cannot keep this board and put it out as a table where no doubt a cat or two will sit and damage this sticker.  I considered putting urethane on and using it anyway, but that doesn't seem right.   It's too wonderful to mistreat.  This needs to belong to someone who will appreciate it.  I guess it will be sold.  I am in mourning.  I sure hope the right owner will come along.  I hope some dingbat doesn't get it and rip off the sticker, toss it in the trash and then turn the board into something tacky.  I will likely never meet the owner, so when it sells I'm going to pretend it was bought by someone who will treasure it.

Isn't she a beauty?

 On the other hand, maybe I should urethane the top.  It would keep the sticker forever in place.  The top would be more durable and able to withstand tabletop use.  What do you think?


I have linked to the following parties:
Thrift Share Monday at Apron Thrift Girl
Metamorphosis Monday at Between Naps on the Porch
Show off Your Cottage Monday at The House in Roses

Anything Related at All Thingz Related 
Nifty Thrifty Tuesdays at Coastal Charm
Lucky Linky Tuesday at Lucky Star Lane
Anti-Procrastination Tuesdays at New Nostalgia

Weekly Treasures at Southern Hospitality
Take a Look Tuesday - Sugar Bee - Craft Edition  

Vintage Inspiration Friday - Common Ground

August 22, 2010

Weekend Porch Party #3 ... and Soil Gnats - Ugh!

I desperately need porch time!  Please join my party with visions of porches and gardens so I may escape.

Lately, I have been suffering from the dreaded Household Attention Deficit Syndrome.  This is an under-appreciated malady and is likely the leading cause of homes being condemned.  I find myself going from one task to another before any are complete.  I'm glad that guests at my party cannot come to my house. It's definitely not looking its best!

Soil Gnats
As for my garden topic, it isn't very glamorous, but it's one that many gardeners will eventually run into.  I am on the second planting of my salad garden.  The first planting was a complete flop thanks to issues with my newly purchased soil.  The issue?  Soil gnats (aka fungus gnats).


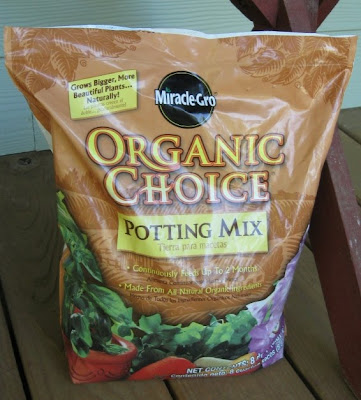
I bought 6 bags of this pricey organic potting mix for my 6 oh-so-perfect planters.  When I opened the bags, I noticed the swarm of little gnats and in my ignorance, I used the soil anyway.  My seeds still came up but within days the seedlings starting wilting and dying.  I learned that fungus gnat larvae eat the seedlings from below. 

A Fungus Gnat
I declared war.  I tried every folk remedy I could find - vinegar, oil, yellow sticky paper, plastic covered containers of wine (which would have done me more good if I'd gulped it down).  That worked on maybe 5 or 6 of them.  There's a carnivorous plant (Cape Sundew) that takes care of these gnats and some botanical gardens use them to keep bad bugs at bay.  I found them online, but not locally.  I didn't have time to wait.

I finally resorted to the sure thing.  I baked the soil.  In my kitchen.  In my oven. In my pans.  I haven't been excited about cooking since.  I still have several batches to go.  With the weather being so hot and muggy, I only do it in the early morning hours. Note to self:  If possible, save soil baking til the weather is cool enough to have the house open with pleasant breezes blowing.  Tornado-like winds would be even better.


I am now a major proponent of sterilizing soil.  I was doubtful at first - am I killing the good stuff in the soil?  Several sources said studies show plants grow better in sterilized soil.  My second batch of seedlings are coming up just fine.  OK.  I believe.

How To Sterilize Soil
Put the soil into glass or metal or clay baking containers so the soil is less than 4 inches high.

The soil should be slightly damp. If it forms a clump when you squeeze a handful, it's too soggy.  Dry soil is said to be difficult to sterilize.

Cover the containers tightly with foil. If your nose works, take that step seriously!

Set the oven for at least 180 but not over 200 degrees.  If you bake at a higher temperature, it will release toxins that are harmful to your plants. Once the temperature of the soil reaches 180, continue cooking for 30 minutes.  I didn't have an oven thermometer so I just set the oven to 190 and baked for 75 minutes including oven warm up time.

Here's a final bit of advice.  Let the oven cool completely.  Don't open the door.  Once the pans are cool to the touch, take them outside.  Do not lift the foil til you are out of your house.  Baking soil is not a pleasant odor. 

No more gnats. Happy seedlings.  It worked!

Another tip for keeping the gnats at bay - water plants from below.

So now that I have gotten everyone all excited about gardening (Ha!) and relaxing on the porch, on to the party!

I'll start us off with a few links of my own.


LinkWithin

Related Posts with Thumbnails