Pages

June 29, 2010

Canning Beans Tutorial

I have helped can beans before.  I've never done it by myself.  I need to learn.  My memory stinks.  So today, when I went to my parents house for yet another bean canning lesson, I took detailed notes and a million photos.  I'm putting everything I learned right here.  I feel sure that I could do it by myself after this.  I took lots of photos, but my parents were camera shy today, so you'll only see their hands and arms.

This lesson is based on green beans being canned in quart jars.  If you use a different vegetable or a different size jar, the times would be different.

What we used:
This canning kit really comes in handy.  All the gadgets with blue on the handle are from this kit.
This is the pressure canner we used. It holds up to 7 quart sized jars.

How to Can Beans

Have clean quart sized canning jars on hand.  Inspect the jar rims very carefully.  If a speck of anything is there or if there's a nick in the jar, they won't seal properly.

Snap and wash the beans.  Put them in a pot.  You can do this the day before and refrigerate them if you like.


Put water in a large pot and bring it to a boil. Pour boiling water over the beans til they are well covered. Boil for 5 minutes.


While waiting, put the jar lids & bands in boiling water to sterilize.


The canning funnel makes filling the jars easier.

Warm up the jars by rinsing them in warm water.  Dip out the beans and fill canning jars up to the rim.  Try not to add too much water til the beans are well packed in the jar. Then add water till it's up to the rim of the jar. That leaves about 1/4 to 1/2 inch head space at the top of the jar.  If there are leftover beans, but not enough to fill a jar, have them for dinner or add them to the next batch if you will be canning again soon.


Add salt to each jar. The recipe calls for 1 tsp, but if you are using canning salt, you might want to just use 1/2 tsp.  Clean the jar rims again.  A speck of salt on the rim could keep the jar from sealing.


Place the canning rack in the bottom of the canning pot.  Put 3 quarts of hot water in the canning pot.  You can use the water the lids were boiling in.

The magnetic lid lifter comes in handy!

Put on the jar lids and rings/bands.  Tighten the rings pretty good, then loosen just a tiny bit -1/4 inch.  My dad is the pro at this.

We labeled our beans - this one has a mix of several bean varieties.


Put the jars in the canner using the jar lifter.


Put the lid on the canner and tighten it.  First line up the arrows on the lid and pot, then turn the lid til the handles are together.  Make sure the rubber overpressure plug is in.  On our pressure canner, this is a small black plug.  As a safety backup, if the vent pipe gets blocked or clogged, this little rubber thing will pop out and release steam.


Turn the stove on high.  Watch for the vent pipe to start steaming. Then begin timing.  It needs to steam for 7 minutes.  This is a good time to clean up some of your mess. During steaming, the air vent may start spitting out water.  Just wipe it off every now and then.


At some point during the 7 minutes, the air vent should pop up.  That shows pressure is building.


After the 7 minutes is up, put the pressure regulator on the vent pipe.

Leave the stove on high.  Watch the pressure dial gauge.  The goal is to get to and maintain 10 to 11 pounds of pressure.  When it reaches about 5 to 6 lbs, you can start easing down on the stove temperature.  Continue to adjust the stove setting.  Most likely, you'll end up with the stove on low.


Once the canner reaches 10 pounds of pressure, start timing. Keep it between 10 and 11 pounds for 25 minutes.  You will need to monitor and adjust the whole time.  It may go a little over or under 10-11 pounds.

When 25 minutes is up, LIFT (don't slide) the canner off the burner.  Let the pressure drop on its own - don't do anything to try to speed up this process.

The pressure is down when the air vent drops back down and no steam comes out when the pressure regulator is tilted.  Don't use the dial gauge as an indicator - even when it goes back to zero, the pressure may not be down enough. During this lesson, it took 45 minutes for the pressure to go down.  Occasionally, a jar may pop while still in the canner.

When the pressure is down, take off the pressure regulator and remove the lid.  Everything is still hot so use oven mitts and tilt the lid so steam goes away from your face. 

Using a jar lifter, remove jars and place them on a towel, leaving at least a 1 inch space between jars during cooling.  It won't be long before you'll hear the jar lids start popping.  There's a small bump on the lid.  Once it pops, that bump is gone.  Some will pop faster than others.  It only took 5 or 6 minutes for all of ours to pop.

I have joined the following parties:

June 28, 2010

Family Reunion Time!

Yesterday we went to my husband's family reunion.  He has a bunch of aunts and uncles, and half a million cousins, who have kids of their own.  I must say, they are are really fun family!  It was loads of fun, but I'm still worn out.

There was lots of good food which I didn't take pictures of because I was too busy stuffing my face.

 2010 Reunion

By the way, the handsome guy in the top right corner of the collage is my wonderful hubby. 

We gathered at Aunt Jane's house, which is about an hour and a half away.  Her house is wonderful - very old and full of character.  We had such a large crowd that we ended up staying outside all day.  Even though it was scorching hot, we stayed in the shade of her huge trees and there was a steady breeze - it was surprisingly nice.  I only noticed the heat if I ventured out into the sun.

Jane's House - photo taken several years ago

One bit of excitement - through a crazy comedy of errors, a huge hornets nest was stirred up and the crowd under that tree cleared REALLY fast!  Amazing, only 1 person was stung - Uncle Jim - right behind the ear.

The Wasp Incident

June 26, 2010

Watermelon Juice

I bought a big watermelon a week or so ago.  I kept putting off cutting it because there just wasn't room in our refrigerator to handle the leftovers. 

Finally, I decided to cut it up, remove the seeds, put it in the blender and make a watermelon drink.


I remembered making a watermelon drink last year. I remembered that it was delicious.  Unfortunately, I didn't remember that there was something besides watermelon in the recipe.  I wish I had read my watermelon smoothie post from last July.  I forgot about strawberries.

It's pretty tasty actually, but I do think it would be better with the strawberries.  It will be even better when I am using one of the watermelons from our garden.  They are only babies right now.
I was able to fill a couple of glasses and put away several quart jars full for later.  Notice the green screen in the background.  That's the screen I found at my last yard sale outing.  I thought it would make a pretty good background in this photo.

My creative husband suggested I freeze some in ice trays for drinks and smoothies.  He has been coming up with some great ideas lately and this one was great.  When I told him I was going to put his idea on my blog, he wanted to make sure that I gave him full credit.  He's a hoot.

I took the leftovers outside.  Buddy was the only 4 legged watermelon lover. He thanked me and told me it was incredibly refreshing.  Buddy is such a gentleman.


UPDATE:  I added strawberries and mango to my last quart jar of watermelon juice and put it back through the blender.  Ohhhh - yummy! ...much better than plain watermelon (which wasn't at all bad).   The original recipe didn't call for mango, but I just tossed it in on a whim.  Mango seems to go with everything. 

I have joined the following parties:

Summer Sunday #4 at The Tablescaper
Just Something I Whipped Up at The Girl Creative

Hot Day Yard Saling

Yesterday I had a bit of luck yard sale-ing.  But I must say, it was hot and miserable.  Southern girls are not supposed to sweat.  Glistening is allowed, but not sweating.  I'm sure I was over the legal limit.

I have a feeling that yard sales won't be very plentiful again until the summer heat is over.  I know that I'll be very selective about going to sales for the next few months and I'll be sure to be out very early and home again pretty quick. 

I found every one of these things at the first yard sale. All of it, plus a tray my mom got (which was fabulous) was $15. 

I loved the toile fabric on the sewing stool.  This will make a great place to hide a project from our nosy cats.

I had thought the bird houses would end up on my porch.  After trying them there and a number of other spots, I ended up liking them best on this window sill.  In fact, I really like them here.  Sometimes I place things and think they look okay or pretty good.  Those are the times where the item is likely to be rearranged.  I have a feeling these bird houses will stay here for a while.

I loved the wooden tri-fold screen at first sight - so much so that I bought it without having a clue how I'd use it.  I wandered the house for ages trying to figure out where to use it. It would be good for hiding something, but I have nothing to hide (ha ha). Then I set it down on a table and it occurred to me that I really liked how it looked flat.  I think I'm going to use it as a wall hanging.  I'm not sure where.


The sewing stool and metal basket ended up in the guest room.  It looks pretty nice in there, but the table needs a lamp.  The table was one that I picked up a couple of weeks ago at a yard sale.  It is very similar to a slightly smaller one I recently refinished.  I painted this one the same color, but without the red undercoats.  

By the way, this is the guest in our guest room.  Mr. Spooky had settled down for a nice long nap.

Cindy Lou had settled down for a nap in another room. She was sound asleep just like this.  Does she really think no one can see her?

I have joined the Garage Salen' Party at Debbiedoos.

June 25, 2010

I've Been Featured Again!!!

Crazy Domestic is a fun blog that I've recently discovered.  The blog is run by Steph and Megan who are sister-in-laws and great friends.  I love their logo and blog design.  The 60's look is fabulous and the color scheme is wonderful.  The blog is wonderful.  They have so many wonderful ideas.  I know.  I have browsed for hours.

Steph is also the gal behind Somewhat Simple. She hosts the Strut Your Stuff parties on Thursdays.

Crazy Domestic is host to a wonderful monthly link party - All Things Domestic - on the first Tuesday of the month.

While browsing, I discovered that they have a spot where anyone can submit an idea to be featured. I submitted my painted floors and the rest is HISTORY!

featured

June 24, 2010

Amazing Ideas Out There

Why do I love reading blogs?  Lots of reasons.  But one of the big ones is the amazing ideas I come across.  Lately, I've seen a ton.

Check out this one from Peppertowne.  She turned an out of date coffee table into a fabulous bench.  I've seen these coffee tables at yard sales and just walked right on by.  Forget that.  I want to try this!

Want to see more of this transformation?
She has photos of the whole process.

While you're visiting her site, be sure to check out
how she transformed these bentwood rockers.

I love this painted desk transformation from The Painted Hive.
Keeping the top wood instead of
painting the whole thing really makes it, don't you think?
Before

After

While browsing around her site,
I also came across this chair and stool:

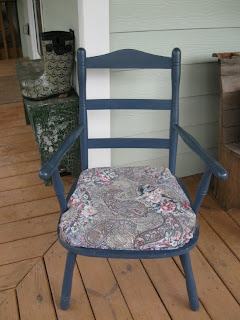
It just so happens that I'm working on a similar chair right now! I wasn't sure how I wanted to do the cushions.  This chair certainly gives me some ideas.  Here's the before on my chair-


I have been flip flopping on whether to do a full out for the house makeover or turn it into a garden chair with a plant sitting in the seat.  There are staple/tack marks all along the edge.  This chair certainly doesn't have the pretty details of the chair from The Painted Hive, but it could be much nicer than when I got it (from a yard sale of course). 

Another idea I'm eager try is adding ruffles to plain t-shirts.  Tea Rose Home has a great tutorial.

Here's another tutorial from Welcome to the Good Life.
So pretty!
I have plenty of t-shirts to cut up, too!


Finally, if you are prepared to just get lost in blogland,
check out this amazing party hosted by My Desert Cottage:

Over 450 bloggers have participated in this party.  The links are in a list on the right side of her blog page.  They are all sharing photos of where they create - just like the magazine.  That's a lot of posts to go through, but they are going to be available for a year.  They'll stay posted on My Desert Cottage for a while and then, she's moving them over to a special blog she created just for that.  Click here for more info.

June 22, 2010

I've Been Featured!

I have just recently started putting my blog out there, so to speak.  I've been joining link parties and networking.  I don't really have any specific goals in mind.  I just like sharing.

Today my post on bread and butter pickles was featured 
by Stephanie Lynn at Under the Table and Dreaming!!!  

UndertheTableandDreaming

I'm excited!  I wasn't really sure if many would be interested in making pickles, but I wrote it up in detail so that next year, I could refer to it, and I thought maybe somebody else might find it useful as well.  I have been amazed - I've had oodles of visits to that post.  That's an excitement only a fellow blogger can understand. My husband tried to act excited but I don't think he really gets it.  But he's happy for me and that's good enough.

Summertime is SUN TEA Time

It's hot outside!  It's too hot for me to go out in the middle of the day... except to put out a pitcher so I can make some sun tea.

Sun tea is so easy!  Just fill up the pitcher with water, toss in some tea bags, cover it with plastic wrap, and put it out in the sun for at least 3 hours.  The ribbon is mostly for fun.

No electricity.  No heating up the house.

Here are a few tips:
  • If you like your tea sweet, add the sweetener after you bring it in while it's still warm.
  • Since the tea was not boiled, you should plan to refrigerate it and drink it up pretty quick.
  • The tea may not be as strong.  You can add more tea bags or leave the tea bags in longer.
My current favorite is Rooibos herbal tea.  That's what you see in the pitcher/picture!


I have joined the following link parties:

Tutorial Tuesdays at Hope Studios

Nifty Thrifty Tuesdays at Coastal Charm

June 21, 2010

Treadmill Desk

Just a month or so ago, I was really getting into setting up my new desk station upstairs.  My DH and I have a shared office downstairs - mostly for his business.  I'm his bookkeeper.  His desk faced a window, mine a wall.  I loved moving upstairs - lots of space, tons of windows.  DH hated it. He moaned and groaned and had a couple of very impressive conniption fits.  I finally admitted defeat graciously moved everything back downstairs.  He's very happy.  I'm making the best of it.

The main computer is downstairs.  The old computer is now upstairs.  It's not hooked to the internet.  I attempted networking it, but there were too many issues.  It now has a new purpose - it's part of my treadmill desk.

I first came across this idea in 2006.  I saw a segment on TV about Dr. James Levine.  He was a bigwig at the Mayo Clinic.  His department didn't have sit down desks - they had desks designed around treadmills.  Everyone worked while walking slowly.  You can read a bit about it here or you can do a Google search and come up with tons of articles and videos.

As soon as I saw the idea, I set about figuring out how to convert my treadmill to a desk without spending money.  Here's what I came up with:
2006 treadmill desk at my old house
It was great.  I used it for ages until my treadmill began acting up.  Once I gave up on that treadmill, we were starting to build our house and I didn't have the money to replace it.

After we moved, my parents gave me their treadmill and I used it downstairs watching movies in our spare bedroom.  This past weekend my dear hubby decided that since I had given up my loft desk he would help move the treadmill upstairs.  I had wanted the treadmill upstairs but it's heavy as all get out and I'd given up on getting it up there long ago.  Well, it's there now and it's going to be there for a long, long time.  We were both red faced and breathing heavy by the time we made it up there.

Today, I set up this new treadmill desk.
2010 treadmill desk - draft version - improvements coming soon
 This is version 1.  I love having shelves next to the treadmill, but this oak secretary is not going to stay.  I'm going to use the wood shelf that's in the 2006 picture instead.  But it's ugly.  I think if it's painted cream it will look much better.

So what am I doing while I walk my way to buns of steel?  I am scanning!  I have a zillion magazine pictures that I've saved for ages and I want them on my computer, not in folders and drawers.  I had so much fun scanning today that I walked for an hour and a half.  My buns aren't steel yet.  They are more like jello, but by the time I finish scanning all my pictures, they should have a little less jiggle.

Back when I first set up a treadmill desk, people would ask me all the time how I could focus on the computer while walking.  Dr. Levine says to just walk slowly, even one mile per hour is good.  If you stay in front of a computer for awhile, the benefits will add up.  The article says that in an hour you can burn 100 extra calories while walking 1 mph as compared to sitting in a chair.  I find that I can work just fine even at 2 miles per hour.  At times I speed it up even more.  It all depends on what task I'm doing.

2010 treadmill desk - place for keyboard and mouse
 
To set up your own treadmill desk, you just need to figure out where to put the keyboard and the monitor.

You can rest a couple of boards across the treadmill arms for the keyboard and mouse.  I screwed a couple of scraps of wood underneath so the boards would stay put.  I'll probably improve on this setup, but for now I was using what was handy.  The two main boards are covered in fabric - they were once part of an elaborate window treatment.  I really would prefer one nice smooth board that's a little longer. 

The monitor can sit on something tall in front of the treadmill.  If you have a laptop the setup is even easier.

The basket is for one of my cats - Sissy.

Sissy is very intelligent.  Here she is a few years ago watching one of her favorite shows - Meerkat Manor
  Sissy loves hanging out while the treadmill is going.  She developed that habit back in 2006 and today when she saw what I was doing, she got very excited.  She walked all over the treadmill, keyboard, shelf, etc, checking everything out.  She was very vocal about it, too.  She definitely approves. The basket is one of her favorites, but today she clearly preferred sitting on the keyboard.

2010 treadmill desk - temporary spot for scanner
  Here's a better view of the scanner.  The secretary is not flat on top and it's not the right size for the printer.  But I'm impatient and did not want to wait til the more suitable shelf is painted.  I plopped an old window shutter on top.  The printer/scanner sits there just fine and I can make do.  Watch for more posts in the future as I continue to improve my setup!

I have linked this post to the following parties:
Metamorphosis Monday at Between Naps on the Porch
DIY Showcase at The DIY Show Off
Motivate Me Monday at Keeping it Simple
Making Monday Marvelous at C.R.A.F.T.
Made By Me Monday at Creative 2x Mom

June 20, 2010

In a Pickle

Friday and Saturday, I put away 12 jars of pickles.  That does not include the pickles made on Thursday when I got pickle lessons from Trish.  I can't remember how many jars we got that day.  3 or 4 I think.   That may not seem like much, but let me tell you, I am pickled out!

It was fun the first day.  I made zucchini pickles.  It only called for 2 lbs of zucchini and made 3 pints.  The day wasn't overly busy.  I had that happy domestic goddess feeling.

Saturday.  Not fun.  I felt like a domestic hag.  I had way too much going on.  Do not make pickles when you have other things to do. The bottom line - I goofed.  The recipe called for 4 lbs of zucchini to make 7 pints.  I cut up 7 lbs of zucchini and ended up with 9 pints from this batch - it should have been more, but I ran out of pint jars.

The pickle recipe using zucchini is pretty much like this one.  I'm posting the one calling for cucumbers.  I'm writing it up with the correct amounts - not the amounts I used to make up for the fact that I had cut up way too many cucumbers.


Bread and Butter Pickles

SOAKING

  • 4 lbs 4-6 inch cucumbers
  • 2 lbs onions 
  • 1/3 cup salt

Slice the cucumbers and onions.  Put half of them in a very large bowl or pan.  Sprinkle with half the salt.  Then add the rest of the cucumbers and onions and finish with the rest of the salt.

Cover with ice cubes.

Set the timer for 1-1/2 hours.


While waiting, wash 7 pint jars.  Check the jar rims carefully to make sure there are no nicks.

THE JUICE

Combine the following ingredients in a small pan and bring to a boil.
  • 2 cups sugar
  • 2 TBS mustard seed
  • 2 tsp turmeric
  • 2 tsp celery seed
  • 1 tsp ginger
  • 1 tsp peppercorns
  • 3 cups vinegar

When the timer goes off, remove any ice that hasn't melted.  Drain and rinse the cucumbers and onions.   Put them in a large pan.  Add the vinegar and spice mixture.  Return to a boil.


While waiting, wash the small pan and use it to sterilize the jar lids in boiling water.  Save this boiling water - it can be used shortly for processing.


FILLING THE JARS

Pack hot pickles and liquid into jars, leaving 1/4 inch headspace. 

Wipe off the tops of jars and attach the two piece jar lids.


PROCESSING

Place rack on the bottom of the canner and fill halfway with water.  Note: you don't have to have a real canning pot to do this.  You won't be pressure cooking.  A really large tall pot with a lid will do.  You WILL need a metal rack of some sort to put the jars on .  They shouldn't sit right on the pot.  If you ARE using a canner, remove the overpressure plug & pressure regulator doe the lid.  Set aside.

Heat water.

Use jar lifter to place filled jars on cooking rack in canner. Check water level.  Add more boiling water if necessary, so the water is at least 1 inch above the jar tops.  That's why you need a really tall pot!

Place cover on pot. Process pickles for 10 minutes.   The 10 minutes starts when the water starts boiling.
Lower the heat setting to maintain a gentle boil throughout processing.  Add more water if necessary to keep the water level above the jars.

After 10 minutes, turn off heat.  Remove the pot lid.  Using a jar lifter, remove jars and place them on a towel, leaving at least a 1 inch space between jars during cooling.  It won't be long before you'll hear the jar lids start popping.  There's a small bump on the lid.  Once it pops, that bump is gone.  Some will pop faster than others.  If it never pops, then that can of pickles should be refrigerated and eaten first.

Note: I have this canning kit.  It really comes in handy - especially the jar lifter and the funnel. 

Allow jars to cool naturally 12 to 24 hours before checking for a seal.  Do not re-tighten bands.

It's best to wait 4 to 6 weeks for the pickles to cure and develop a satisfactory flavor.

If you follow directions better than I did, you will have 7 pints jars of pickles instead of 9.  One of my favorite things to do with these is to dice them up and use in salads - tuna salad, chicken salad, and egg salad.  Most people just enjoy snacking on them. 

These would make nice gifts, too - especially with a cute label.  Hmmmm.  Maybe I'll make one more batch.


I've linked up to these parties:

Sunday Showcase at Under the Table and Dreaming
Weekend Wrap Up Party at Tatertots and Jello
Check Me Out Saturdays at I Am Only One Woman
Sunday Scoop at I Heart Naptime