Showing posts with label Salad Garden. Show all posts

February 1, 2011

Growing Greens Indoors

This post is for Maria.  She and her family are stationed in Germany.  It's very cold and she is having a hard time finding good fruits and vegetables.  The commissary is, apparently, not known for their produce section.  I have a number of posts about growing greens and vegetables indoors for the winter (or anytime of year actually).  This post will pull together and link to the various posts. 

 The absolute easiest way to add some greens to your life is by growing sprouts. It's cheap and easy and you can add them to sandwiches, salads and more.  They are super nutritious and can be ready to eat in just a few days.  My post on sprouts is here.

You can grow lettuce and spinach indoors.  I'm doing it now.  I have 4 planters going, but really should have more.  Maybe I'll get some more going this week.  


Lots of things can be used as containers.
You can plant them in any size planter or pot.  If you don't have real planters or pots, be creative and find something that could be used as a planter.  

Lettuce and spinach do great in a sunny window.  If you don't have a good sunny window, you can put them under a grow light.  You can even grow other salad fixin's indoors, like tomatoes and bell pepper, but they won't do well with just a sunny window.  They also need a grow light.  However, I do have a cherry tomato growing in a sunny window without a grow light.  It produces.  Not a lot, but some.

Having things growing in your house, especially the kitchen, is really nice.  Take a look at my post on the Southern Living House kitchen and notice how nice it looks with all the herbs and greens.  I especially love the one on the table.

They'll be ready to eat in a month.  You can even eat them sooner when they are young and tender.  I have several links with valuable tips on growing lettuce and spinach indoors on my Garden page.


 Bakers racks are great to use to hold lots of salad planters.  They are easy to move to the porch when the weather warms up.

Kale grows well in the winter and some varieties can survive in temps as low as 5 degrees.  I have some growing in planters outside, but haven't eaten any yet.  They are so pretty and colorful I haven't had the heart to cut them.  I need to get over that.

Spring isn't far away.  Salads are cool weather crops.  You may want to consider having some salad tables and growing an absolute feast of greens. The ones above look pretty deep, but all the research shows you only need about 3 or 4 inches of dirt.


If you can't find good produce, 
produce it yourself!


UPDATE:  I realize that not everybody reads the comments on a post and this one from Staci is too good to not be read. It's such a good idea!!!   ---

The principal at our elementary school decided to fundraise for growboxes in every classroom. There are quite a few apartments in our school boundary, and she realized that a lot of the kids had no idea that you COULD produce your own produce. She ran the fundraising, and a boy scout built the boxes for his Eagle project. The kids get to tend the boxes and when they're ready to harvest, the produce gets added to the salad bar in the lunch room.


I'm linking this post with  -

November 7, 2010

Two Bakers Rack RE-dos

I bought another bakers rack at a yard sale.  I thought about selling it in my booth for two seconds.  I decided to keep it til something snazzier comes along.  First, it was in dire need of a makeover.  

 It's one of those cheap-o models.  It was green with icky fake wood.  But it's sturdy and the shelf sizes are perfect for my salad garden bins.

Paint is all this little rack needed.  But what color?  I had lots of inspiration - remember my post on bakers racks a few weeks ago?

I decided on ORB (Oil Rubbed Bronze).  Why?  I don't know.  I'm in love with that color right now.  I had a couple of cans on hand.  If it had been spring, I might have painted it Heirloom White.  See how much thought I put into things?


While I was at it, I decided to give the ORB treatment to my oldest bakers rack, which I had painted a hideous hunter green at least 20 years ago. 


 Oh yes.  Much better!

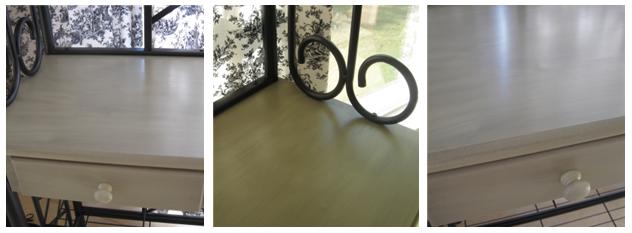
Next step - paint the fake wood.  I sanded and primed, then painted it with Ralph Lauren's Raffia.  

I loved covering the fake wood.  But still, I wanted more.  More turned out to be Minwax Wood Finish in Ebony.  I rubbed it on and wiped most of it off.  


The color is very chameleon-like.  It can be whatever you want it to be and looks different all day as the light changes - gray, tan, taupe, off-white, khaki, green, gold.  I'm not kidding.  I don't even know what color family to put this in.  


Now it's all put back together and in front of one of our large south-facing windows.  Hopefully, it will be home to salad greens all winter.


I added these little yard sale birdies after the above photo was taken.  I think they'd look better another color, but they work fine with all the golds in this location. 

I know I'll soon change the whole look on this bakers rack with other accessories.  This is just a thrown together, good-enough-for-now look.

The other bakers rack is in the loft where I have another bank of south facing windows.  I got everything in place in the nick of time.  It has dipped below the magic 32 degree temp for the last two nights and will likely do so again tonight.  Hello.  This is Georgia.  I'm not supposed to have to move all my plants in this early!


I even had to move in a few things that need to be planted outside - like the lavender and hosta.  

One thing I do love bringing in are the geraniums.  I can keep those blooming all winter long.  I rotate them around all winter long, putting the prettiest ones downstairs.  While upstairs, I trim them back so they won't be so leggy next spring.

September 23, 2010

Kale - Decorative and Edible + Garden Party

I bought two heavy cement planters a couple of weeks ago at a yard sale.  Instead of planting them with mums or some other decorative fall plant, I decided to plant kale.  

The hardest part was moving the planters to their new location.  I was determined to do it without Mr. Dream's help - he's been working way too hard lately and I feel guilty asking him to do anything extra.
First, I tried using a wagon.  That required lifting the planter up and over into the wagon.  Let me just say that my biceps got a Gold's Gym worthy workout.  Whew!

For the second planter, I pulled out the hand trucks.  That was sooooo much easier.

If I had planned ahead or not been in a rush for instant gratification, I could have grown my kale from seed. Instead, I bought ten small plants - five for each planter.  That does NOT allow for the recommended spacing, but I'm figuring on cutting the outer leaves on a fairly regular basis.  We'll see how it goes.  Three plants per container might have worked better. 


I'll try to remember to do an update in a month or so.  By then, the planters should be looking lush and colorful.

Lots of gardeners use kale can be used as an ornamental.  In zone 7 and above it can be used as a winter annual.  Experts say it looks especially nice with pansies and dianthus.  I planted my kale with... more kale.  I got three varieties and unfortunately, the tags don't tell you what's what.  They labeled all three flowering kale.  Well that's helpful.  One of the varieties is definitely a curly one.

Kale with purple mums from Arabella Weddings Blog
I do want my kale to look attractive, but mainly, I want to eat it. It's very nutritious!!!  I especially love using kale in green smoothies. Note:  I was going to link to my previous post about green smoothies and can't find one.  Can it be that I have not posted about green smoothies?  Oh, my.  They are fabulous and don't taste "green" at all.  I'll post about them soon - maybe even this week.

It's pretty wilt resistant so lots of restaurants use it to make their salad bar look prettier. At home, it would be pretty as part of a serving platter arrangement.

from Sullivan and Murphy

Tips on Growing Kale
Small Print Disclaimer:  
I have never grown kale before.  
All the information here is gleamed from my research.
I'll let you know how it all works out. 

Kale is not crazy about heat, so, for now, I put the planters in a spot that receives only morning sun.  It's still pretty hot here in Georgia.

from Kennedy's Country Gardens

The cool fall weather brings out the color. Kale will hold their brilliant color all the way into spring.  You can grow them in pots to decorate your porch or patios, or plant a group together right in your garden beds. They grow 1 to 2 feet tall.

from Better Homes and Gardens
My kale should do well even in the winter. Around December, I'll probably move the planters to a full sun location.  It's one of the most frost tolerant of vegetables.  It's fine with temperatures as low as 20 degrees. Some sites said they would survive as low as 5 or 10 degrees depending on the variety. If it gets really cold, I'll probably cover or move mine just to be safe.

Kale actually needs the cool weather. It needs several nights of frost to make it sweet. The frost helps break the sugars into starches.

from Southern Living
To harvest, you can cut a few leaves at a time when the plant is 8 to 10 inches high. You start with the outside leaves first. Or you can harvest the entire plant.  Cut 2 inches above the soil and the plant will sprout new leaves in 1 to 2 weeks. Harvest kale before it gets old and tough. 

from My Sweet Savannah - She has more examples on this post!
 The good thing about having my own kale plants is that the fresher the plant, the sweeter it is.  The flavor gets stronger the longer it's refrigerated.  Who knows just how fresh it is when you get it in the grocery store.

from Garden Delights
 Now - - - Time for Porch and Garden Party #8!

 Link up posts you have 
about anything to do with porches or gardens 
- door decorations, nature, sunrooms...
indoor and outdoor plant posts are welcome, too!


Lots of you are decorating your doors and porches for fall - please link up!


I've joined in with the following parties:
100 Ideas Under $100 at Beyond the Picket Fence
Strut your Stuff at Fireflies and Jelly Beans
Hooking Up With HOH at House of Hepworths
It’s Party Time  at Pony Tails and Fish Scales
Strut Your Stuff Thursday at Somewhat Simple
Thrifty Thursday at Tales from Bloggeritaville
Make It Yours Day at My Backyard Eden
Show and Tell at Blue Cricket Designs
Show Us What You're Workin' With at Me and My Bucket
Creative Share Wednesday at Trendy Treehouse

September 21, 2010

Bakers Racks

Bakers Racks are so useful.  They've been around for ages.  I got my first one at least 20 years ago.   I've used it for all sorts of things - to hold towels in a bathroom, to hold cookbooks in the kitchen, as a plant stand, and lately, as a launch pad in our coatroom. It started out black and many years back, I painted it hunter green.  At the time, I thought changing it to hunter green was wonderful.  The poor thing has been neglected since then. And you know it's been a long, long time since hunter green was "in". 

But then, at a yard sale this weekend, I spied a very pretty bakers rack, (larger than our old launch pad rack).  I sweetly asked if it was for sale and held my breath.  The lady said she really didn't want to sell it.  She liked it.  She didn't know why her husband brought it out for the sale.  Anyway, if she sold it, she'd have to have at least $10.  My heart rate increased. I tried to look calm - not too eager or pushy.  I guess I'll take it for 10.  She still wasn't sure.  She'd have to ask her husband.  Her husband, my new best friend, wanted her to get rid of it.  They were redoing the room.  They'd get something nice and new.  It came home with me and after a very brief thought of putting it in the booth for display, ended up giving my coat room a nice lift. I hope the lady who sold it to me gets something she loves.


 Now, I'm going to work up my nerve and show you the old one, in exactly the state it was in just before the transformation process began.
Ohhh Honey... am I really posting this photo?
What a mess.  The old green one is smaller.  I try to keep it looking neater than this, but when things get hectic, it quickly becomes a mess.  Like I said, this is our launch pad.  It holds our keys and umbrellas and whatever we'll need as we come and go. My purse even looks unhappy in this picture!

So, the old green one is now in the attic awaiting a makeover (with the Rustoleum oil rubbed bronze that I've fallen in love with!)

The new one is taller - four shelves instead of three.  And the shelves are wider.  There's plenty of room in this corner, so the larger size of the rack is an improvement.  And it folds flat, so it will be super easy to move should I ever want to do so.

The shelves are very pretty!  I just love those swirls.

I had so much room after organizing the necessities, 
that I was able to add in a little fall arrangement.

I plan to replace the Longaberger basket on the bottom shelf with something else - not sure what.  It will need to be something tall, otherwise our darling cats will get into it and pull out whatever is there.  Honestly!  We don't have pets - they have us!!!

This is our other bakers rack.  I got it on sale, at a incredibly low price, at Home Depot at least 5 years ago.  Right now, it's home to our salad planters.  In July, I posted about how much I wanted a Salad Table.  As cool as those tables are, in the end I decided to use planters on this rack so I could easily bring it inside when the weather turns cold.  I want fresh lettuce and spinach all winter long.  This rack also folds flat.  It will be a cinch to move inside in a few months.

So far, my growing plan is working great.  I've staggered the planting.  I'm already eating lettuce from two of the containers.  Supposedly, I should be able to snip off some leaves and the plant will keep growing.  I will probably fill the old green bakers rack with more salad plants.  I love salads and it doesn't get any fresher than this. 

I almost forgot - I have a fourth bakers rack.  Uh-oh. Am I becoming obsessed? 


This one is also on our kitchen porch.  It's sort of a holding spot for plants.  Most of the things growing here are going to be moved or replanted soon. 

It's a little delicate looking for my tastes.  The flowers are painted in pastels (not as bright as they appear in the closeup).  I haven't been able to bring myself to paint it. I can't picture this rack painted black or bronze.  Maybe a grey/silver/galvanized look could be interesting. Or a bright fun color???  Or... maybe I should leave it as is, and sell it to someone who will love it just as it is.  I think it's pretty, but I don't really decorate with pastels.  This one also folds up.


Bakers racks come in so many sizes and styles and serve so many purposes.
Here are some pretty ones I found while browsing -

I love the slightly industrial look of this one from Sweet Nothings.
This one from Simply Sailing got a makeover including a piece of leftover counter-top.
This one from Lomond View was used outside at a reception.

Kay Ellen decorated hers for Christmas.
Here's another one using for entertaining - as seen on Apartment Therapy.
As seen on Old Sweetwater Cottage
Another great one found on Old Sweetwater Cottage
Now, are you excited about baker's racks or what!?!


Be sure to check out my Porch and Garden Party.  It's not too late to join in!

I've joined in with the following parties:
Anything Related at All Thingz Related
Tuesday Garden Party at An Oregon Cottage
Nifty Thrifty Tuesdays at Coastal Charm
Lucky Linky Tuesday at Lucky Star Lane
Saturday Nite Special at Funky Junk Interiors
Vintage Inspiration Fridays at Common Ground
Fab Friday at Frugal and Fabulous Design
Home and Family Fridays at Home is Where My Story Begins 
It's a HodgePodge Friday at It's a HodgePodge Life
Show and Tell Friday at My Romantic Home 
I'm Lovin' It Fridays at Tidy Mom 
Alphabet Thursday at Mrs. Matlock's 

August 22, 2010

Weekend Porch Party #3 ... and Soil Gnats - Ugh!

I desperately need porch time!  Please join my party with visions of porches and gardens so I may escape.

Lately, I have been suffering from the dreaded Household Attention Deficit Syndrome.  This is an under-appreciated malady and is likely the leading cause of homes being condemned.  I find myself going from one task to another before any are complete.  I'm glad that guests at my party cannot come to my house. It's definitely not looking its best!

Soil Gnats
As for my garden topic, it isn't very glamorous, but it's one that many gardeners will eventually run into.  I am on the second planting of my salad garden.  The first planting was a complete flop thanks to issues with my newly purchased soil.  The issue?  Soil gnats (aka fungus gnats).


I bought 6 bags of this pricey organic potting mix for my 6 oh-so-perfect planters.  When I opened the bags, I noticed the swarm of little gnats and in my ignorance, I used the soil anyway.  My seeds still came up but within days the seedlings starting wilting and dying.  I learned that fungus gnat larvae eat the seedlings from below. 

A Fungus Gnat
I declared war.  I tried every folk remedy I could find - vinegar, oil, yellow sticky paper, plastic covered containers of wine (which would have done me more good if I'd gulped it down).  That worked on maybe 5 or 6 of them.  There's a carnivorous plant (Cape Sundew) that takes care of these gnats and some botanical gardens use them to keep bad bugs at bay.  I found them online, but not locally.  I didn't have time to wait.

I finally resorted to the sure thing.  I baked the soil.  In my kitchen.  In my oven. In my pans.  I haven't been excited about cooking since.  I still have several batches to go.  With the weather being so hot and muggy, I only do it in the early morning hours. Note to self:  If possible, save soil baking til the weather is cool enough to have the house open with pleasant breezes blowing.  Tornado-like winds would be even better.


I am now a major proponent of sterilizing soil.  I was doubtful at first - am I killing the good stuff in the soil?  Several sources said studies show plants grow better in sterilized soil.  My second batch of seedlings are coming up just fine.  OK.  I believe.

How To Sterilize Soil
Put the soil into glass or metal or clay baking containers so the soil is less than 4 inches high.

The soil should be slightly damp. If it forms a clump when you squeeze a handful, it's too soggy.  Dry soil is said to be difficult to sterilize.

Cover the containers tightly with foil. If your nose works, take that step seriously!

Set the oven for at least 180 but not over 200 degrees.  If you bake at a higher temperature, it will release toxins that are harmful to your plants. Once the temperature of the soil reaches 180, continue cooking for 30 minutes.  I didn't have an oven thermometer so I just set the oven to 190 and baked for 75 minutes including oven warm up time.

Here's a final bit of advice.  Let the oven cool completely.  Don't open the door.  Once the pans are cool to the touch, take them outside.  Do not lift the foil til you are out of your house.  Baking soil is not a pleasant odor. 

No more gnats. Happy seedlings.  It worked!

Another tip for keeping the gnats at bay - water plants from below.

So now that I have gotten everyone all excited about gardening (Ha!) and relaxing on the porch, on to the party!

I'll start us off with a few links of my own.


LinkWithin

Related Posts with Thumbnails