Showing posts with label Porch and Garden Party. Show all posts

October 7, 2010

Take a Closer Look + OCTOBER Porch & Garden Party

The days are cooler now and the nights have been downright chilly (by Georgia standards).  The flowers are still hanging on.  They look a bit frazzled, but if you take the time to take a closer look, they are still quite pretty.
Maybe, it's a bit like people.  
As people get older, they may not seem all that attractive, 
but if you take the time to get closer to them, 
you might find they are truly beautiful,
in the best sense of the word.

Everyone has beauty if you just look closely enough.


OCTOBER Porch and Garden Party

This is the last Porch and Garden Party for 2010.  
I'm going to keep it open through the whole month!

Fall porches always seem to be a bit exciting, don't you think? 

Feel free to add any posts you create that go along with the theme.

The main topic is, of course, porches and gardens. 

If you make something that would look good on a porch, that'll do.  Sunrooms count as porches.  Anything outdoorsy is good.  Door decor - perfect!  Fall decor - yeah!  If you think your post works with this theme, then it's fine!  Anyway,what kind of a host would I be if I turned someone away from a party? Welcome...  and enjoy!


I'm joining the following parties:

October 1, 2010

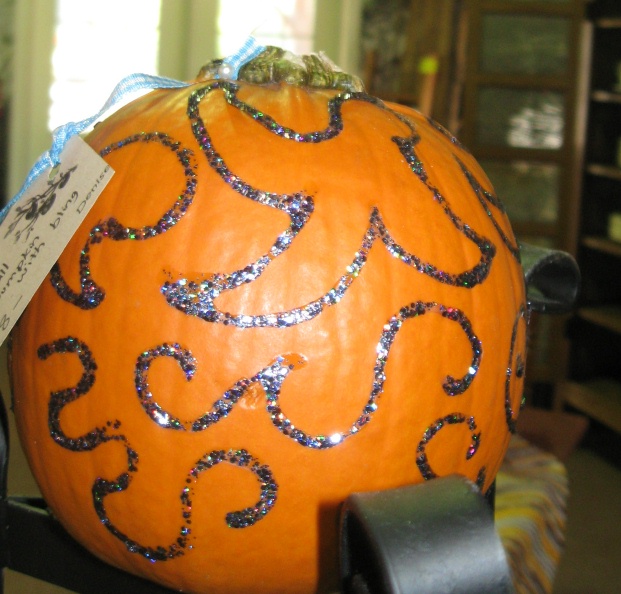
Pumpkin Bling TIPS and Porch Party

I have been making loads of pumpkins with bling. (You can see my first set here.)  I've been learning a few things as I go. I'll be happy to share.

If you decide to make pumpkins to sell, you must be crazy!   I'm selling my small pumpkins with bling for $8.  I'm not making hardly a thing on it.  I am, however, having a little fun.  Next year, maybe I should make my own pumpkins.  Buying pumpkins is expensive.  And, this next year, I'll watch for big sales on my materials.  Even so, the profit will be very small.  But if I priced the pumpkins to cover my materials and minimum wage, no one would buy them!  

I'm telling you, 
if you live near Newnan, Georgia, 
you might as well stop by Rockin' B and buy mine - 
they are a real bargain!


There's a big difference in wire.  Soldering wire is wonderful (especially when it's from your husband's stash), but too expensive.  I found some craft wire in gold - 16 gauge - and it, too is wonderful and less expensive.  I found some black bead wire - 24 gauge - and it was a royal pain to work with. The 24 gauge looks about the same in the package as the 16 gauge.  You can't go by looks.  The 24 was too flimsy for pumpkin bling.
Now, why didn't I turn the big one to the good side of the pumpkin?

Sequins are inexpensive, look pretty, but are time intensive!  Any pumpkins I made with sequins are a major deal, but I'm earning maybe 25 cents an hour!  But, for some crazy reason, I enjoy doing it.  It's not easy, though, with a big ole band-aide on my thumb.


Gold spray paint looks fabulous, but you have to be very careful transporting the pumpkin.  The spray paint can chip off.  A little touch up with gold brush on craft paint should help.  Even with the added "danger", it's worth it - it's so pretty!  A coat of primer might be something to think about - especially if you are decorating a fake pumpkin to keep year after year.


You also need to be careful transporting pumpkins with the glitter paint.


Ribbon is fast and easy and looks great, but there goes your profit.  Watch for sales.  Get lots of colors.  I think I'm developing a ribbon fetish.  There's no way I can sell enough pumpkins to pay for my ribbon - most of which I got on sale, by the way!  There are other similar things you can use - hem lace and rope can be cute.  The ribbon with sewn in beads is annoying - beads pop off (and fall to the floor) with every cut.  On the upside - they are less worrisome than dropping a straight pin.  Those suckers can be hard to find!


You don't have to use sequin pins with the sequins.  Regular straight pins will do and they are much less expensive in bulk.  Other pins are fun, too. Pins with round heads look good, but cost a little more.  I used corsage pins from the floral department - they looked great and went on way faster than sequins.  Another tip - once you stick a pin in, don't pull it back out - pumpkin juice starts seeping out!
The things that look like pearls are corsage pins.

If you are the thrifty type - and I hope you are - when pumpkin time is over, remove some of the decorations to reuse next year! The ribbon and wire should come out easily.  The sequins and pins should come out fine and I really hate to think of those in a landfill where a little critter may come across them.  Next year you'll be able to impress your friends by creating your own pumpkin with bling (without having to spend a small fortune on materials!

And for a final tip - display them in groups!  If you have just one, it doesn't have quite the impact of a group of at least three.  I've played around with.  The more the merrier.  I promise - I'm not just saying that to sell more!!!

Time for another Porch and Garden Party! 
The main topic is, of course, porches and gardens, but I'm pretty loose.  If you make something that would look good on a porch, that'll do.  Sunrooms count as porches.  Anything outdoorsy is good.  Door decor - perfect!  Fall decor - yeah!  If you think your post works OK with this theme, then it's fine!  Anyway,what kind of a host would I be if I turned someone away from a party?    Inspire us!


I've joined in with the following parties:
    * 100 Ideas Under $100 at Beyond the Picket Fence
    * Strut your Stuff at Fireflies and Jellybeans
    * Hooking Up With HOH at House of Hepworths
    * Get Your Craft On Thursday at Life as Lori
    * It’s Party Time  at Pony Tails and Fish Scales
    * Transformation Thursdays at The Shabby Chic Cottage
    * Strut Your Stuff Thursday at Somewhat Simple
    * Thrifty Thursday at Tales from Bloggeritaville
    * Making it With Allie at What Allie's Making Now

September 23, 2010

Kale - Decorative and Edible + Garden Party

I bought two heavy cement planters a couple of weeks ago at a yard sale.  Instead of planting them with mums or some other decorative fall plant, I decided to plant kale.  

The hardest part was moving the planters to their new location.  I was determined to do it without Mr. Dream's help - he's been working way too hard lately and I feel guilty asking him to do anything extra.
First, I tried using a wagon.  That required lifting the planter up and over into the wagon.  Let me just say that my biceps got a Gold's Gym worthy workout.  Whew!

For the second planter, I pulled out the hand trucks.  That was sooooo much easier.

If I had planned ahead or not been in a rush for instant gratification, I could have grown my kale from seed. Instead, I bought ten small plants - five for each planter.  That does NOT allow for the recommended spacing, but I'm figuring on cutting the outer leaves on a fairly regular basis.  We'll see how it goes.  Three plants per container might have worked better. 


I'll try to remember to do an update in a month or so.  By then, the planters should be looking lush and colorful.

Lots of gardeners use kale can be used as an ornamental.  In zone 7 and above it can be used as a winter annual.  Experts say it looks especially nice with pansies and dianthus.  I planted my kale with... more kale.  I got three varieties and unfortunately, the tags don't tell you what's what.  They labeled all three flowering kale.  Well that's helpful.  One of the varieties is definitely a curly one.

Kale with purple mums from Arabella Weddings Blog
I do want my kale to look attractive, but mainly, I want to eat it. It's very nutritious!!!  I especially love using kale in green smoothies. Note:  I was going to link to my previous post about green smoothies and can't find one.  Can it be that I have not posted about green smoothies?  Oh, my.  They are fabulous and don't taste "green" at all.  I'll post about them soon - maybe even this week.

It's pretty wilt resistant so lots of restaurants use it to make their salad bar look prettier. At home, it would be pretty as part of a serving platter arrangement.

from Sullivan and Murphy

Tips on Growing Kale
Small Print Disclaimer:  
I have never grown kale before.  
All the information here is gleamed from my research.
I'll let you know how it all works out. 

Kale is not crazy about heat, so, for now, I put the planters in a spot that receives only morning sun.  It's still pretty hot here in Georgia.

from Kennedy's Country Gardens

The cool fall weather brings out the color. Kale will hold their brilliant color all the way into spring.  You can grow them in pots to decorate your porch or patios, or plant a group together right in your garden beds. They grow 1 to 2 feet tall.

from Better Homes and Gardens
My kale should do well even in the winter. Around December, I'll probably move the planters to a full sun location.  It's one of the most frost tolerant of vegetables.  It's fine with temperatures as low as 20 degrees. Some sites said they would survive as low as 5 or 10 degrees depending on the variety. If it gets really cold, I'll probably cover or move mine just to be safe.

Kale actually needs the cool weather. It needs several nights of frost to make it sweet. The frost helps break the sugars into starches.

from Southern Living
To harvest, you can cut a few leaves at a time when the plant is 8 to 10 inches high. You start with the outside leaves first. Or you can harvest the entire plant.  Cut 2 inches above the soil and the plant will sprout new leaves in 1 to 2 weeks. Harvest kale before it gets old and tough. 

from My Sweet Savannah - She has more examples on this post!
 The good thing about having my own kale plants is that the fresher the plant, the sweeter it is.  The flavor gets stronger the longer it's refrigerated.  Who knows just how fresh it is when you get it in the grocery store.

from Garden Delights
 Now - - - Time for Porch and Garden Party #8!

 Link up posts you have 
about anything to do with porches or gardens 
- door decorations, nature, sunrooms...
indoor and outdoor plant posts are welcome, too!


Lots of you are decorating your doors and porches for fall - please link up!


I've joined in with the following parties:
100 Ideas Under $100 at Beyond the Picket Fence
Strut your Stuff at Fireflies and Jelly Beans
Hooking Up With HOH at House of Hepworths
It’s Party Time  at Pony Tails and Fish Scales
Strut Your Stuff Thursday at Somewhat Simple
Thrifty Thursday at Tales from Bloggeritaville
Make It Yours Day at My Backyard Eden
Show and Tell at Blue Cricket Designs
Show Us What You're Workin' With at Me and My Bucket
Creative Share Wednesday at Trendy Treehouse

September 16, 2010

Pumpkins for the Porch

 I have seen plenty of different ways to decorate pumpkins over the years.  I am sorry to say that in the past I have not been terribly creative when it came to fall decorating.  I have so many things going now that it's not likely I'll go too crazy this year, but dang it, I'm going to put forth a little effort.  It really doesn't take much to give it some oomph.

My starting point is this wonderful ~ very heavy ~ wrought iron shelf that I bought at a recent yard sale.

I knew as soon as I put it on my porch that it was meant to have 4 pumpkins on it.  That was the easy part.  The hard part?  How should the pumpkins be decorated?

I could always leave them plain.  The orange color would really pop against the black. That could be understated and elegant (which is not me).  It would be easy - which would be great.  Or... I might leave them plain for a bit, then decorate them in a few weeks. 
When I'm ready to change the look of the pumpkins,  
I'll have plenty of inspiration.

As seen on Good Housekeeping
Gilded as seen on Fabulous Finishes

As seen on Ruthie's Renewed Treasures
As seen on Country Living

As seen on Home Improvement

As seen on Crafty Nest
These Mendhi designs are on a gourd, but why not try out the technique on a pumpkin?  Click here for details.
From Amber Elizabeth - this blog appears to have been removed

As seen on Parents Magazine
As seen on Southern Living - templates here
 
Well now.  I'm inspired!  The hard part will be deciding which look to go for.


Now it's time for another Porch and Garden Party. 


I WENT ALL OUT and joined in with a bunch of my favorite parties:
Make It Yours Day at My Backyard Eden
Show and Tell at Blue Cricket Designs
Power of Paint at Domestically Speaking
Spotlight Yourself at It's So Very Cheri
Show Us What You're Workin' With at Me and My Bucket
Get Your Craft On Thursday at Life as Lori
It’s Party Time  at Pony Tails and Fish Scales
Transformation Thursdays at The Shabby Chic Cottage
Strut Your Stuff Thursday at Somewhat Simple
Strut your Stuff at Fireflies and Jelly Beans
Favorite Things Friday at A Few of My Favorite Things
Flaunt it Fridays at Chic on a Shoestring Decorating
Friday Finding Beauty at Dipity Road
Home and Family Fridays at Home is Where My Story Begins
Friday Make Mine Beautiful at It's a Blog Party 
Show and Tell Friday at My Romantic Home
Remodelaholic's Anonymous Meeting at Remodelaholic
I'm Lovin' It Fridays at Tidy Mom
A Link Party at The Twice Remembered Cottage

September 10, 2010

Blue Porch Ceilings

When it came time to choose paint colors for our house, there was only one thing I was certain of - I wanted the ceilings of my porch to be blue.  That was my easiest decision.

My porch - August 2008
My Porch Ceilings:
Sherwin Williams
Open Air 6491
*SATIN FINISH


Blue porch ceilings are an old tradition dating back to the mid-1770s, when Prussian blue pigment became popular. Prussian blue was invented in Germany. Before then, blue pigment was pricey and the color didn't hold. Prussian blue was a light robin's egg blue.  In the mid 1800's the color took off in Aurora Colony and became known as Aurora blue.  


The shade of blue used for porch ceilings can vary, but usually it's sort of a sky blue or robin's egg shade.

Aside from the fact that the blue is very pretty, calming, and reminds one of the sky, there are two other interesting side benefits. 


It is believed that the blue color repels insects.  I read one article where a homeowner tested this out by painting half of his porch ceiling blue and left the other half white.  All the wasps nests were on the white side.  He was convinced.  Our porch is large and wraps all the way around 3 sides of the house.  We've had a couple of wasp nests, but nothing big.  And they were built attaching to our white trim.  Hmmm.  Maybe there's something to it.


 The other side benefit is less easy to prove. It is said that the blue chases away evil spirits. In the South Carolina Lowcountry, they call the blue color haint blue.  A haint, by the way, is a spirit or ghost.  I must say, we haven't had any problems with evil spirits since we moved here.


Thanks Shala!!!  This one is Sago Cottage on St John, Virgin Islands.


Cherry Hill Cottage - This porch belongs to Tina's sister Kathy, who lives in Houston - click here for more
  Thanks so much to Rose Vine Cottage  for recognizing this wonderful porch.  I should have known! Cherry Hill Cottage is a blog I follow regularly. Tina is so creative and so are all of her friends and relatives.


Note about photos in this post - I try to give credit when I use photos that are not my own.  Unfortunately, all but one of these photos were from my collection before I came up with a way to keep up with where they came from. If you know the source, please let me know, so I can give credit!


September 3, 2010

Porch and Garden Party # 5

I think the party is starting to catch on!  I sure did get inspired by entries from the last party. Take a look -

Cuisine Kathleen used a bed canopy cover as a tablecloth.  I am completely smitten!  Please click on the link to her post so you can see how it turns out once it's all set up.  Beautiful. Be sure to notice the folded napkins with delicate white flowers tucked in.

I have several very pretty twin sized coverlets and dust ruffles.  I may have to pull them out and start playing.  What a fun idea!

Plus, take a look at her wrap around porch and yard.  It's beautiful and neat as a pin.  And isn't that hosta out front gorgeous? There are more porch photos on the same post. 


I love this blue table seen on Happy to Design.  She had a tea party for herself on her veranda to celebrate her birthday.  I love the extra care she took to make it special for herself - her post has some wonderful pictures of the the amazing pieces, many with sentimental value.  It's amazing how being kind to yourself translates in being able to be better for others.


Three Pixie Lane has a wonderful screened porch.  You need to see the before pictures to appreciate all she has done.  There are many things to inspire in her post, but one item in particular took my fancy.  It's a simple linen (burlap-y textured) and cotton table runner. Or maybe it's a place mat.  There are several photos with it, but it's not visible in the one above.  You'll need to go to her post to see it!

Here's another porch post from Three Pixie Lane.  This one is about her porch on the beach in North Carolina.  This porch is wonderfully simple and fresh.  I would love to settle in on this porch swing with the blue and white ticking pillows positioned just so and gently swing in rhythm to the sound of the waves.  Mmmm.  Nice.  How lucky she is to have two such wonderful porches!

You know... just thinking here... if we ever move again, I think I'd want a tiny little house with a fabulous screened porch.

 Linda at A Toile Tale linked up a wonderful end of summer porch tablescape.  She used sea glass colors as her inspiration.  It was purposely kept simple - no patterns.  It's pretty in this photo, but to truly appreciate it, you need to read her post and see the pieces she used. 

Now, let's party some more!


LinkWithin

Related Posts with Thumbnails