I came across an old wooden toolbox that a lady was wanting to sell. It had a great shpae, but was made of plywood, which I'm not fond of. Still, it had possibilities.
I painted it green and added a chalkboard area. I kept it at home long enough to create a pattern to make another. My hubby wanted the ones we make to be a little different. The bottom wouldn't show in front. It would be completely tucked inside. I got another tool lesson and we built another one. My cutting was a little off and I made the two ends a little taller than I intended. The next one will be shorter.
I'm keeping the one we made. It's in our family room on top of an armoire. I'd like another for the porch and another in my loft. I could think of lots of places to use them. I could even make one to go in the bathroom to hold toilet paper!
I don't have photos of the one we made and am too lazy to go take them. I'll be making more soon.
Showing posts with label Get Creative. Show all posts
March 4, 2012
January 6, 2012
A Fairy Tray
I transformed a silver tray and a vintage picture by combining them.
I had a lovely antique picture of fairies. The original frame was broken. I put the print in an old, heavy, beautifully tarnished, silver tray using decoupage medium.
It was a match meant to be - I didn't even have to trim! It's sooooooo pretty. I wanted to keep it, but forced myself to take it to the booth, where I hope it will find a home with someone who'll love it as much as I do. Or maybe I hope that it sits there unsold and I have to bring it back home. If it's still there the next time I go over, I may have to bring it back home. I'm having seller's remorse!
I had a lovely antique picture of fairies. The original frame was broken. I put the print in an old, heavy, beautifully tarnished, silver tray using decoupage medium.
It was a match meant to be - I didn't even have to trim! It's sooooooo pretty. I wanted to keep it, but forced myself to take it to the booth, where I hope it will find a home with someone who'll love it as much as I do. Or maybe I hope that it sits there unsold and I have to bring it back home. If it's still there the next time I go over, I may have to bring it back home. I'm having seller's remorse!
Isn't this picture enchanting?
Labels:
Before and After,
Get Creative
December 31, 2011
Pink Crocheted Scarf
I finished up one last project for 2011! It's a pink crocheted scarf. It's so pretty and I can't wait to wear it. It's really long, perfect for wearing in a European Loop.
I haven't crocheted in decades! I have been knitting a bit. A tiny bit. Washcloths. Do not be impressed. I used to crochet like crazy and even made some afghans in my day. Still, I was never a pro and I never was a perfectionist about it. A true yarn artist would be amused (or horrified) by my creations.
My mom made a scarf for my niece, Sarah, for Christmas. It was lime green - Sarah's new favorite color. It was fabulous. I fell in love and decided it would be such fun to try. I needed a TV watching project. This was a timely project. I have a winter cold and I've been a couch potato for the last couple of days.
The pattern had come from a free Hobby Lobby pattern card. I was able to find the pattern - Taffy Pull Scarf - online. The original pattern is for a striped scarf. The one my mom made was a solid color and I liked that MUCH better.
Over the summer I had come across a bunch of wonderful cotton yarns at - where else - a yard sale. Needless to say, I had a stash to pull from. I chose the pink. It's not as thick as the pattern calls for. Since I'm not a perfectionist, I didn't let that worry me. I had a number of crochet hooks. The pattern calls for size I-9. Didn't have that so I used a J-10. Close enough. But I should have compensated by decreasing the chain stitches at the beginning to maybe 200 or 225. I ended up with a lacier scarf than my niece's. Both are pretty. I am thinking that I'd like to make an ivory or gray one with a thicker yarn. It would be good to have a warmer scarf, too. The bottom line - it will come out pretty even if you don't use exactly what's called for.
When I printed the original pattern, the print was too small to easily read, plus there was lots of extra info about changing colors, which I didn't plan to do. I redid the pattern for one color. If you want the original pattern, go here. If you want solid, copy and paste this:
FINISHED MEASUREMENTS - Scarf is 6" x 85". (I didn't measure mine, but this is pretty close).
MATERIALS
177 yd - 3.5 oz (100 g) balls
I used 3 1/2 skeins of 115 yd - 50g - 1 3/4 oz - 100% cotton - Patons Weekender yarn in coral (looks like a dusty pink)
Crochet Hook: 5.5mm [US I-9].
Yarn needle.
Ch 256
Row 1: Sc in 2nd ch from hook and in each ch across – 255 sc.
Note: I used a hook one size larger and my scarf is too long!
Rows 2 - 5 : sc in each sc across.
Row 6: ch 4 (counts as tr), turn, *skip 1 st, tr in next st, tr in skipped st; repeat from * across to last st, tr in last st. (Sounds hard, but is very easy!)
Row 7: ch 1, turn, sc in each st across, sc in top of ch-4.
Rows 8-9: repeat Rows 6-7.
Rows 10-11: repeat Rows 6-7.
Row 12: ch 1, turn, sc in each st across, sc in top of ch-4.
Rows 13-16: ch 1, turn, sc in each sc across.
Fasten off.
FINISHING
Cut 12" lengths of different colors of yarn to add to long tails. Matching colors with row tails, fold lengths in half. Each Fringe should have 6 strands. Pull folded end of lengths through each row end. Pull ends of lengths and long tails through folded end.
Weave in ends.
GAUGE: 12 sts = 4" in single crochet. CHECK YOUR GAUGE. (I obviously didn't bother) Use any size hook to obtain the gauge.
Note: Scarf is worked lengthwise. Leave 6" tail when beginning and ending to add to Fringe.
ABBREVIATIONS:
ch = chain
mm = millimeters
sc = single crochet
st(s) = stitch (es)
tr = triple or treble crochet
* = repeat whatever follows the * as indicated
I haven't crocheted in decades! I have been knitting a bit. A tiny bit. Washcloths. Do not be impressed. I used to crochet like crazy and even made some afghans in my day. Still, I was never a pro and I never was a perfectionist about it. A true yarn artist would be amused (or horrified) by my creations.
My mom made a scarf for my niece, Sarah, for Christmas. It was lime green - Sarah's new favorite color. It was fabulous. I fell in love and decided it would be such fun to try. I needed a TV watching project. This was a timely project. I have a winter cold and I've been a couch potato for the last couple of days.
The pattern had come from a free Hobby Lobby pattern card. I was able to find the pattern - Taffy Pull Scarf - online. The original pattern is for a striped scarf. The one my mom made was a solid color and I liked that MUCH better.
Over the summer I had come across a bunch of wonderful cotton yarns at - where else - a yard sale. Needless to say, I had a stash to pull from. I chose the pink. It's not as thick as the pattern calls for. Since I'm not a perfectionist, I didn't let that worry me. I had a number of crochet hooks. The pattern calls for size I-9. Didn't have that so I used a J-10. Close enough. But I should have compensated by decreasing the chain stitches at the beginning to maybe 200 or 225. I ended up with a lacier scarf than my niece's. Both are pretty. I am thinking that I'd like to make an ivory or gray one with a thicker yarn. It would be good to have a warmer scarf, too. The bottom line - it will come out pretty even if you don't use exactly what's called for.
When I printed the original pattern, the print was too small to easily read, plus there was lots of extra info about changing colors, which I didn't plan to do. I redid the pattern for one color. If you want the original pattern, go here. If you want solid, copy and paste this:
Taffy Pull Scarf
Stitch Nation by Debbie Stoller "Bamboo Ewe™"FINISHED MEASUREMENTS - Scarf is 6" x 85". (I didn't measure mine, but this is pretty close).
MATERIALS
177 yd - 3.5 oz (100 g) balls
I used 3 1/2 skeins of 115 yd - 50g - 1 3/4 oz - 100% cotton - Patons Weekender yarn in coral (looks like a dusty pink)
Crochet Hook: 5.5mm [US I-9].
Yarn needle.
Ch 256
Row 1: Sc in 2nd ch from hook and in each ch across – 255 sc.
Note: I used a hook one size larger and my scarf is too long!
Rows 2 - 5 : sc in each sc across.
Row 6: ch 4 (counts as tr), turn, *skip 1 st, tr in next st, tr in skipped st; repeat from * across to last st, tr in last st. (Sounds hard, but is very easy!)
Row 7: ch 1, turn, sc in each st across, sc in top of ch-4.
Rows 8-9: repeat Rows 6-7.
Rows 10-11: repeat Rows 6-7.
Row 12: ch 1, turn, sc in each st across, sc in top of ch-4.
Rows 13-16: ch 1, turn, sc in each sc across.
Fasten off.
![]() |
| The triple stitches used in rows 6, 8 and 10 create the lacy bits down the center of the scarf. |
FINISHING
Cut 12" lengths of different colors of yarn to add to long tails. Matching colors with row tails, fold lengths in half. Each Fringe should have 6 strands. Pull folded end of lengths through each row end. Pull ends of lengths and long tails through folded end.
Weave in ends.
GAUGE: 12 sts = 4" in single crochet. CHECK YOUR GAUGE. (I obviously didn't bother) Use any size hook to obtain the gauge.
Note: Scarf is worked lengthwise. Leave 6" tail when beginning and ending to add to Fringe.
ABBREVIATIONS:
ch = chain
mm = millimeters
sc = single crochet
st(s) = stitch (es)
tr = triple or treble crochet
* = repeat whatever follows the * as indicated
Labels:
Get Creative
November 24, 2010
Headboard Bench Gets a Makeover
Months ago, I bought a bench at a yardsale. It was obviously made from a headboard. The lady who sold it to me said it was an incomplete project that she got tired of looking at. She just wanted it gone. I was happy to help her out.
It sat at our house waiting for attention for ages. I began to wonder if one day, I too, would just want it gone. It was already partially painted. It was as if someone had been putting on the first coat and was interrupted and then never got back to it. Or maybe they were going to do some sort of two toned finish. I don't know.
I got started on it last week. Knowing I would be distressing it, I didn't even prime it. I wish I had read Barb Blair's great article (Design Sponge) on subtle crackle finish last week. I would have used a bit of crackle here and there. I also would have made my first coat of paint something other than black.
I bought some one inch thick foam and put four pieces of it together to form a cushion. I would have preferred to have one nice four inch thick piece, but Hobby Lobby didn't have it and I didn't have the patience to wait. As the Nester says, "It doesn't have to be perfect to be beautiful." I find myself using that quote often these days. It's a wonderful phrase to help you feel better about not being a perfectionist.
I made "underwear" for the cushion - a cover for the foam to go under the real slipcover. I made it from a painter's dropcloth. I love dropcloth slipcovers for the real slipcover, but in this case, I had something else in mind. I haven't had time to make the real slipcover, so this project isn't officially finished. I plan to pipe the real slipcover and make it look a little bit snazzy.
With Thanksgiving cooking to do, I didn't have time to finish. The bench cushion would have to settle for underwear for a few days. But then, all my furry friends came to investigate. Ugh oh. I decided to give it a temporary cover out of a fabric similar in color to the one I'll be making. I just wrapped a few yards of fabric around the cushion and tucked it here and there. Why bother? Because, I swear, if I didn't , one of the kitties would barf on the dropcloth cover and it was incredibly hard to pull over the foam. I hope not to have to wash the "bench underwear" very often. So... better safe than sorry.
I had fun playing with pillows. I don't think I have the right look yet. All of these pillows came from yard sales, and I love them, but I believe I need some a little smaller. I recently found some pillows at a yard sale that would have been great on this bench. I put them in my booth and they sold. Dang! (or , if you speak French, ^%$#@!)
Once I finish the real slipcover, I'll feature it in another post. Meanwhile, I'm happy with it.
Thanks to her unfinished project,
I now have a wonderful bench in my coat room,
but it was a long time coming.
It sat at our house waiting for attention for ages. I began to wonder if one day, I too, would just want it gone. It was already partially painted. It was as if someone had been putting on the first coat and was interrupted and then never got back to it. Or maybe they were going to do some sort of two toned finish. I don't know.
I got started on it last week. Knowing I would be distressing it, I didn't even prime it. I wish I had read Barb Blair's great article (Design Sponge) on subtle crackle finish last week. I would have used a bit of crackle here and there. I also would have made my first coat of paint something other than black.
I bought some one inch thick foam and put four pieces of it together to form a cushion. I would have preferred to have one nice four inch thick piece, but Hobby Lobby didn't have it and I didn't have the patience to wait. As the Nester says, "It doesn't have to be perfect to be beautiful." I find myself using that quote often these days. It's a wonderful phrase to help you feel better about not being a perfectionist.
I made "underwear" for the cushion - a cover for the foam to go under the real slipcover. I made it from a painter's dropcloth. I love dropcloth slipcovers for the real slipcover, but in this case, I had something else in mind. I haven't had time to make the real slipcover, so this project isn't officially finished. I plan to pipe the real slipcover and make it look a little bit snazzy.
With Thanksgiving cooking to do, I didn't have time to finish. The bench cushion would have to settle for underwear for a few days. But then, all my furry friends came to investigate. Ugh oh. I decided to give it a temporary cover out of a fabric similar in color to the one I'll be making. I just wrapped a few yards of fabric around the cushion and tucked it here and there. Why bother? Because, I swear, if I didn't , one of the kitties would barf on the dropcloth cover and it was incredibly hard to pull over the foam. I hope not to have to wash the "bench underwear" very often. So... better safe than sorry.
I had fun playing with pillows. I don't think I have the right look yet. All of these pillows came from yard sales, and I love them, but I believe I need some a little smaller. I recently found some pillows at a yard sale that would have been great on this bench. I put them in my booth and they sold. Dang! (or , if you speak French, ^%$#@!)
Once I finish the real slipcover, I'll feature it in another post. Meanwhile, I'm happy with it.
~~~~~~~~
Be sure to check out the latest RE- Party!
We RE-do, RE-decorate, RE-organize, RE-pair, RE-upholster,
RE-furbish, RE-finish, RE-purpose, and of course, we love to RE-lax!
This party celebrates the RE-'s in our lives!
Take a look at these other wonderful link parties for more clever ideas.
I'm linking this post with them!
- Nifty Thrifty Tuesdays at Coastal Charm
- Themed Linkups - Headboards - at Funky Junk Interiors
- Make It Yours Day at My Backyard Eden
- Show and Tell at Blue Cricket Designs
- Look What I Made at Creations by Kara
- Power of Paint at Domestically Speaking
- Show Us What You're Workin' With at Me and My Bucket
- We're Organized Wednesday at Organize and Decorate Everything
- Piece of Work Wednesday at Primitive and Proper
- Creative Share Wednesday at Trendy Treehouse
Labels:
Before and After,
Bench,
Coat Room,
Get Creative,
Painting,
Pillows,
Sewing + Fabrics,
Slipcovers
October 8, 2010
My Niece Blings Pumpkins, Too!
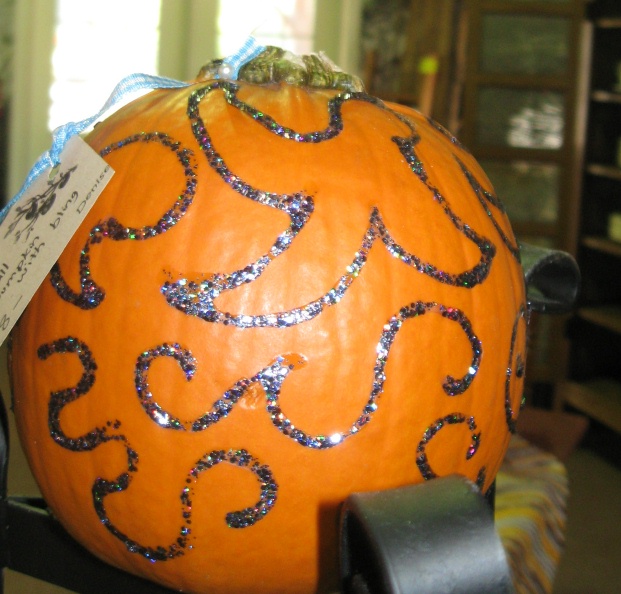
My niece, Denise, is a blinger!
Don't get confused. We are both named Denise. She was not named after me. She was born a little before I came on the scene. Even crazier - we have a third Denise in the family now. Family get-togethers can get real confusing. It's like a tacky Southern joke!
Anyway, back to the bling. Check out the FABULOUS pumpkins with bling she made!
In the words of Denise, the Niece ~ I got the idea from a magazine. They're super easy, and will last year after year. All the supplies came from Michael's. Philip [he DH] thinks I need a
job... The boys [her sons] are less than impressed. They want a werewolf pumpkin.
and
Be sure to check out the
OCTOBER Porch and Garden Party.
It's the last one for 2010
and will be open all month!
Fall porches are fabulous!
I'm joining these wonderful parties:
- 100 Ideas Under $100 at Beyond the Picket Fence
- Strut your Stuff at Fireflies and Jelly Beans
- Get Your Craft On Thursday at Life as Lori
- It’s Party Time at Pony Tails and Fish Scales
- Strut Your Stuff Thursday at Somewhat Simple
- Making it With Allie at What Allie's Making Now
- Frugal Friday at Shabby Nest
- Flaunt it Fridays at Chic on a Shoestring Decorating
- Look at Me Party at It's Fun to Craft
- What I Made This Week... or This Month... or Last Month at Simply Designing
Labels:
Friends and Family,
Get Creative,
Pumpkins
October 1, 2010
Pumpkin Bling TIPS and Porch Party
I have been making loads of pumpkins with bling. (You can see my first set here.) I've been learning a few things as I go. I'll be happy to share.
If you decide to make pumpkins to sell, you must be crazy! I'm selling my small pumpkins with bling for $8. I'm not making hardly a thing on it. I am, however, having a little fun. Next year, maybe I should make my own pumpkins. Buying pumpkins is expensive. And, this next year, I'll watch for big sales on my materials. Even so, the profit will be very small. But if I priced the pumpkins to cover my materials and minimum wage, no one would buy them!
I'm telling you,
if you live near Newnan, Georgia,
you might as well stop by Rockin' B and buy mine -
they are a real bargain!
There's a big difference in wire. Soldering wire is wonderful (especially when it's from your husband's stash), but too expensive. I found some craft wire in gold - 16 gauge - and it, too is wonderful and less expensive. I found some black bead wire - 24 gauge - and it was a royal pain to work with. The 24 gauge looks about the same in the package as the 16 gauge. You can't go by looks. The 24 was too flimsy for pumpkin bling.
![]() |
| Now, why didn't I turn the big one to the good side of the pumpkin? |
Sequins are inexpensive, look pretty, but are time intensive! Any pumpkins I made with sequins are a major deal, but I'm earning maybe 25 cents an hour! But, for some crazy reason, I enjoy doing it. It's not easy, though, with a big ole band-aide on my thumb.
Gold spray paint looks fabulous, but you have to be very careful transporting the pumpkin. The spray paint can chip off. A little touch up with gold brush on craft paint should help. Even with the added "danger", it's worth it - it's so pretty! A coat of primer might be something to think about - especially if you are decorating a fake pumpkin to keep year after year.
You also need to be careful transporting pumpkins with the glitter paint.
Ribbon is fast and easy and looks great, but there goes your profit. Watch for sales. Get lots of colors. I think I'm developing a ribbon fetish. There's no way I can sell enough pumpkins to pay for my ribbon - most of which I got on sale, by the way! There are other similar things you can use - hem lace and rope can be cute. The ribbon with sewn in beads is annoying - beads pop off (and fall to the floor) with every cut. On the upside - they are less worrisome than dropping a straight pin. Those suckers can be hard to find!
You don't have to use sequin pins with the sequins. Regular straight pins will do and they are much less expensive in bulk. Other pins are fun, too. Pins with round heads look good, but cost a little more. I used corsage pins from the floral department - they looked great and went on way faster than sequins. Another tip - once you stick a pin in, don't pull it back out - pumpkin juice starts seeping out!
![]() |
| The things that look like pearls are corsage pins. |
If you are the thrifty type - and I hope you are - when pumpkin time is over, remove some of the decorations to reuse next year! The ribbon and wire should come out easily. The sequins and pins should come out fine and I really hate to think of those in a landfill where a little critter may come across them. Next year you'll be able to impress your friends by creating your own pumpkin with bling (without having to spend a small fortune on materials!
And for a final tip - display them in groups! If you have just one, it doesn't have quite the impact of a group of at least three. I've played around with. The more the merrier. I promise - I'm not just saying that to sell more!!!
The main topic is, of course, porches and gardens, but I'm pretty loose. If you make something that would look good on a porch, that'll do. Sunrooms count as porches. Anything outdoorsy is good. Door decor - perfect! Fall decor - yeah! If you think your post works OK with this theme, then it's fine! Anyway,what kind of a host would I be if I turned someone away from a party? Inspire us!
I've joined in with the following parties:
* 100 Ideas Under $100 at Beyond the Picket Fence
* Strut your Stuff at Fireflies and Jellybeans
* Hooking Up With HOH at House of Hepworths
* Get Your Craft On Thursday at Life as Lori
* It’s Party Time at Pony Tails and Fish Scales
* Transformation Thursdays at The Shabby Chic Cottage
* Strut Your Stuff Thursday at Somewhat Simple
* Thrifty Thursday at Tales from Bloggeritaville
* Making it With Allie at What Allie's Making Now
Labels:
Autumn,
Get Creative,
Halloween,
Porch and Garden Party,
Pumpkins
September 26, 2010
Pumpkins with Bling
I love a rainy day, and this one is about as perfect as they come. The rain has been slow and steady. The temperature has cooled down. I have windows open so I can feel the breeze and hear the rain. To add to the perfection, I spent a few hours up in my loft being artsy.
A couple of weeks ago, I posted about the iron stand I found at a yard sale. I immediately decided it would make a perfect display stand for pumpkin. It's been years since I've decorated pumpkins and this year I intended to make up for it. I found plenty of inspiration and posted about it here.
I didn't decorate my pumpkins alone. I had help.
My pumpkins are real. They will only be around a couple of months. That's a lot of trouble for something so short lived. I don't regret a single moment of the time it took.
I had so many choices, it was hard to narrow it down to 4 looks. For the smallest pumpkin, I did a ribbon wrap technique. The ribbon is secured with sequin push pins. This technique was quick and easy.
I decorated the next one with two styles of sequins. This technique took the longest and pushing the pins in can be hard on your fingers. I don't know why but I enjoyed doing this one most of all. It was almost like meditating. If you choose to try this, you might want to do it on a small pumpkin.
For the next one, I bent soldering wire into swirls and S's and squiggles. It was loads of fun. I spray painted the pumpkin first with a gold glitter spray paint. The I pushed the wire end into the pumpkin. They stay in place just fine.
I used glitter paint in several colors to decorate the largest pumpkin. It was quick and easy.
Since none of the pumpkins are particularly Halloween-ish, I plan to keep them out through Thanksgiving.
I've joined in with the following parties:
Saturday Soiree at A Little Lovely
Check Me Out Saturdays at I Am Only One Woman
Favorite Things Saturday at Bargain Hunting with Laurie
Saturday Nite Special at Funky Junk Interiors
Saturday Share Your Faves at It's a Blog Party
It's So Very Thrifty at It's So Very Cheri
Weekend Wrap Up Party at Tatertots and Jello
Sunday Scoop at I Heart Naptime
Sunday Showcase at Under the Table and Dreaming
Summer Sundays at The Tablescaper
Making Monday Marvelous at C.R.A.F.T.
DIY Project Parade at The DIY Showoff
Motivate Me Monday at Keeping it Simple
Making the World Cuter Monday at Making the World Cuter
Something I Whipped Up Monday at The Girl Creative
Making it With Allie at What Allie's Making Now ~ open Thurs thru Sunday
Saturday Soiree at A Little Lovely
Check Me Out Saturdays at I Am Only One Woman
Favorite Things Saturday at Bargain Hunting with Laurie
Saturday Nite Special at Funky Junk Interiors
Saturday Share Your Faves at It's a Blog Party
It's So Very Thrifty at It's So Very Cheri
Weekend Wrap Up Party at Tatertots and Jello
Sunday Scoop at I Heart Naptime
Sunday Showcase at Under the Table and Dreaming
Summer Sundays at The Tablescaper
Making Monday Marvelous at C.R.A.F.T.
DIY Project Parade at The DIY Showoff
Motivate Me Monday at Keeping it Simple
Making the World Cuter Monday at Making the World Cuter
Something I Whipped Up Monday at The Girl Creative
Making it With Allie at What Allie's Making Now ~ open Thurs thru Sunday
Labels:
Autumn,
Get Creative,
Halloween,
Pumpkins
September 20, 2010
Mirror Makeover in Oil Rubbed Bronze
A few weeks ago I bought a Pepto Bismol Pink mirror at a yard sale. No doubt, it had been in a sweet little girl's room. The mirror is wrought iron - nice and heavy - and I decided it would look really nice brought back to a darker color.
![]() |
| The Before - I was just about to start spraying when I remembered to take a before shot. |
I have been hearing about Rustoleum's oil rubbed bronze on blogs for a few months. I couldn't find the color at my local Wal-Mart, so I bought a dark brown multicolored textured instead. That didn't work out so well.
Luckily, I only bought one can, which I thought would be plent. The can had 25% more - that ought to do it. In the photo above, you can see the mirror. That's how it looked after the entire can. The coverage was terrible and the color wasn't what I had in mind. I was going to have to get more spray paint, so I went to HD this time, and found the oil rubbed bronze I had been after in the first place. YEAH!!! I bought 4 cans. That way, I'd have plenty for the mirror and hopefully, extra for other projects.
The Rustoleum Universal Metallic covered so much better. I ended up using all of one can and a few squirts from a second can.
It's hard to take a good picture of a mirror. The photo above doesn't do it justice. It really turned out nice.
![]() |
| close up view, so you can see the rich color |
The oil rubbed bronze is everything it was rumored to be. I highly recommend it. The color is fabulous - very dark, almost black - and it covers like a dream. The trigger spray nozzle is a little miracle in itself - easier to use and less messy.
The mirror is going to my booth, where I hope it will be found by someone who thinks it's as pretty as I do. I can't keep it. A standing mirror does not belong in a home with four big dogs. My decorating choices have plenty of limitations!
Note: The oil rubbed bronze is available in spray AND brush-on. I started to get a can of the brush-on, too, but changed my mind. I wish I had gotten it. I thought the mirror was finished and removed the paper. When I moved the mirror down to load it in the car, I found a couple of spots of pink in hard to get to places. I had to re-tape the mirror to spray again. Ugh. The brush-on would have made those touch ups so easy.
Be sure to check out my Porch and Garden Party. It's not too late to join in!
I've joined in with the following parties:
Sunday Showcase at Under the Table and Dreaming
Metamorphosis Monday at Between Naps on the Porch
DIY Project Parade at The DIY Showoff
Something I Whipped Up Monday at The Girl Creative
Motivate Me Monday at Keeping it Simple
Making the World Cuter Monday at Making the World Cuter
Weekly Treasures at Southern Hospitality
Labels:
Booth 188,
Get Creative,
Painting
September 16, 2010
Pumpkins for the Porch
I have seen plenty of different ways to decorate pumpkins over the years. I am sorry to say that in the past I have not been terribly creative when it came to fall decorating. I have so many things going now that it's not likely I'll go too crazy this year, but dang it, I'm going to put forth a little effort. It really doesn't take much to give it some oomph.
My starting point is this wonderful ~ very heavy ~ wrought iron shelf that I bought at a recent yard sale.
I knew as soon as I put it on my porch that it was meant to have 4 pumpkins on it. That was the easy part. The hard part? How should the pumpkins be decorated?
I could always leave them plain. The orange color would really pop against the black. That could be understated and elegant (which is not me). It would be easy - which would be great. Or... I might leave them plain for a bit, then decorate them in a few weeks.
When I'm ready to change the look of the pumpkins,
I'll have plenty of inspiration.
![]() | |
| As seen on Good Housekeeping |
![]() |
| Gilded as seen on Fabulous Finishes |
| As seen on Ruthie's Renewed Treasures |
| As seen on Country Living |
| As seen on Home Improvement |
| As seen on Crafty Nest |
| These Mendhi designs are on a gourd, but why not try out the technique on a pumpkin? Click here for details. |
![]() |
| From Amber Elizabeth - this blog appears to have been removed |
| As seen on Parents Magazine |
| As seen on Southern Living - templates here |
Well now. I'm inspired! The hard part will be deciding which look to go for.
Now it's time for another Porch and Garden Party.
I WENT ALL OUT and joined in with a bunch of my favorite parties:
Make It Yours Day at My Backyard Eden
Show and Tell at Blue Cricket Designs
Power of Paint at Domestically Speaking
Spotlight Yourself at It's So Very Cheri
Show Us What You're Workin' With at Me and My Bucket
Get Your Craft On Thursday at Life as Lori
It’s Party Time at Pony Tails and Fish Scales
Transformation Thursdays at The Shabby Chic Cottage
Strut Your Stuff Thursday at Somewhat Simple
Strut your Stuff at Fireflies and Jelly Beans
Favorite Things Friday at A Few of My Favorite Things
Flaunt it Fridays at Chic on a Shoestring Decorating
Friday Finding Beauty at Dipity Road
Home and Family Fridays at Home is Where My Story Begins
Friday Make Mine Beautiful at It's a Blog Party
Flaunt it Fridays at Chic on a Shoestring Decorating
Friday Finding Beauty at Dipity Road
Home and Family Fridays at Home is Where My Story Begins
Friday Make Mine Beautiful at It's a Blog Party
Show and Tell Friday at My Romantic Home
Remodelaholic's Anonymous Meeting at Remodelaholic
I'm Lovin' It Fridays at Tidy Mom
A Link Party at The Twice Remembered Cottage
Remodelaholic's Anonymous Meeting at Remodelaholic
I'm Lovin' It Fridays at Tidy Mom
A Link Party at The Twice Remembered Cottage
Labels:
Autumn,
Get Creative,
Halloween,
Porch and Garden Party,
Pumpkins,
Thrifty Ideas
Subscribe to:
Posts (Atom)