Showing posts with label Thrifty Ideas. Show all posts

September 16, 2010

Pumpkins for the Porch

 I have seen plenty of different ways to decorate pumpkins over the years.  I am sorry to say that in the past I have not been terribly creative when it came to fall decorating.  I have so many things going now that it's not likely I'll go too crazy this year, but dang it, I'm going to put forth a little effort.  It really doesn't take much to give it some oomph.

My starting point is this wonderful ~ very heavy ~ wrought iron shelf that I bought at a recent yard sale.

I knew as soon as I put it on my porch that it was meant to have 4 pumpkins on it.  That was the easy part.  The hard part?  How should the pumpkins be decorated?

I could always leave them plain.  The orange color would really pop against the black. That could be understated and elegant (which is not me).  It would be easy - which would be great.  Or... I might leave them plain for a bit, then decorate them in a few weeks. 
When I'm ready to change the look of the pumpkins,  
I'll have plenty of inspiration.

As seen on Good Housekeeping
Gilded as seen on Fabulous Finishes

As seen on Ruthie's Renewed Treasures
As seen on Country Living

As seen on Home Improvement

As seen on Crafty Nest
These Mendhi designs are on a gourd, but why not try out the technique on a pumpkin?  Click here for details.
From Amber Elizabeth - this blog appears to have been removed

As seen on Parents Magazine
As seen on Southern Living - templates here
 
Well now.  I'm inspired!  The hard part will be deciding which look to go for.


Now it's time for another Porch and Garden Party


I WENT ALL OUT and joined in with a bunch of my favorite parties:
Make It Yours Day at My Backyard Eden
Show and Tell at Blue Cricket Designs
Power of Paint at Domestically Speaking
Spotlight Yourself at It's So Very Cheri
Show Us What You're Workin' With at Me and My Bucket
Get Your Craft On Thursday at Life as Lori
It’s Party Time  at Pony Tails and Fish Scales
Transformation Thursdays at The Shabby Chic Cottage
Strut Your Stuff Thursday at Somewhat Simple
Strut your Stuff at Fireflies and Jelly Beans
Favorite Things Friday at A Few of My Favorite Things
Flaunt it Fridays at Chic on a Shoestring Decorating
Friday Finding Beauty at Dipity Road
Home and Family Fridays at Home is Where My Story Begins
Friday Make Mine Beautiful at It's a Blog Party 
Show and Tell Friday at My Romantic Home
Remodelaholic's Anonymous Meeting at Remodelaholic
I'm Lovin' It Fridays at Tidy Mom
A Link Party at The Twice Remembered Cottage

September 7, 2010

Yard Sale Checklist

Since having a booth at Rockin' B Antiques, I am apt to purchase a little more at yard sales than I might have in the past.  I have realized that I need to become more organized in my yard sale expeditions.    After making a few easy changes, it's clear that most of these improvements would have been nice even when I was shopping just for myself.

My determination to become more organized began on a thrifting trip when I kept thinking of things I wish I had brought along.  On that trip I bought several things that were fragile and I had a hard time keeping them safe.  At one point I needed a tape measure.  I got hungry because I was gone longer than expected. My phone died.

On the next trip I remembered to pack those things, plus pen and paper.  I used the pen and paper to jot down everything I could think of that would be useful to have or do.  I'm sure I'll come up with a few more things as time goes by, but so far, here's my list:

Things I Need to Do in Advance -
  • Have my phone charged.  I might need to call my dear hubby to bring the truck and pick up something really big.  I keep hoping that will happen.  We need a couple of larger pieces for the booth.
  • Get Cash - plenty of small bills and change
  • Put gas in the car.  Fill 'er up!
  • Have a list of yard sales that look promising.  Early in the week, I check listings for estate sales.  An estate sale has to be close by and look really good. They aren't my favorite way to thrift.  Their prices tend to be higher than yard sales and they are crowded if you go on the first day. On Thursdays, I usually look online for garage and yard sales.  I look on Craigslist and on the local papers online listings.  I copy and paste the ones that look promising.  My list is my guide for which direction to head.  I don't always adhere to the list.  Last weekend, it took hours before I got to the first one on my list because I passed some wonderful ones on the way and of course I had to stop!  Not only do I have a list of sales, but I also map out how to get to them.
Things To Have in the Car -
The things I take with me in the car don't take up much room.  The boxes are the largest things and if need be, they could always be tossed to make room for a large item. 
  • Phone 
  • Cash
  • My list
  • Pen and Paper with clipboard - I like to write down what I bought and how much I paid as I go.  That's mostly to help me with pricing for my booth.  I can also jot down notes (such as things to add to this list!)
  • Map - even though I have a map to the sales on my list, it's easy to get hopelessly lost in a large, maze-like neighborhood that I may have stopped by on the way - I'm thinking a GPS might be a handy thing to have.
  • Water and snacks - it needs to be something easily portable and not messy.  Apples and bananas are my top two choices.
  • Damp washcloth in baggie -   On a few of the hot summer outings lately, I have gotten so sweaty glistened  so badly that I needed something to wash up with.  Even as it gets cooler, I'll continue to take it with me for those times I might pick up something that is sticky or dusty.  Baby wipes would also work.
  • Measuring tape - very helpful to see if a large item will fit in my car
  • Screw driver, pliers - It could come in handy for taking something apart
  • Camera - who knows what photo op I may come across

  • Boxes for containing small items - I prefer 3 or 4 boxes that fit inside of each other.  

  • Tote bags, towel bags, sacks, and plastic bags are very useful, not only for holding items, but also for packing breakable items.  I have a few sacks I've sewn myself from old towels.  Those are great for holding and cushioning breakables.  The bags take up less room than the boxes. If you have a small vehicle, you could take only these and leave skip the boxes.
  • Bungee - I haven't needed this lately, but it could help to hold something in place

  • Booth price kit - I have packed an old makeup bag with extra price tags, string and tape. Many of my yard sale purchases go home with me for a clean up or fix up (or to keep). But, there are plenty of items that I buy that are clean and in great condition - like the beautiful wicker table that I was afraid to bring home for fear one of my cats would use it as a scratching post.  They can go straight to the booth.

More Posts about Yard Sale Shopping:
Yard Sale Shopping Tips  - great post from The Yard Sale Queen
How to Prepare for a Day of Thrifting - from Apron Thrift Girl


Be sure to check out my Porch and Garden Party.  It's not too late to join in!

I've joined in with the following parties: 
Lucky Linky Tuesday at Lucky Star Lane

September 2, 2010

Chalk It Up to Hoosier Fever

I almost called this post Hoosier Mama - to sound like Who's Your Mama.   I can entertain myself for hours with silly things like this.  But, I'll try to show a little self control and get on with the post - a small, but wonderful improvement to one of my Hoosiers.
I painted the cabinet doors with chalkboard paint.  It was cheap.  It was fast.  It was easy. 

This brilliant idea has been around a while and it's caught on because it's really useful.  Most women are list-makers and note-writers because they juggle more than they can handle.  When you add hormone issues and/or lack of sleep, those lists and notes may be all that stands between you and complete chaos. 

I have little notes all over and I try to organize them.  I have a reputation for being organized, but I think maybe I'm losing my touch.  I can't seem to get a good system for all my notes.  I'm going to give chalkboards a go.  I'd like to add chalkboard surfaces in several key areas.  This is my first.


I used painters tape, which turned out to be a mistake.  The paint leaked even though I thought I'd been careful to smooth it down around the edges. Luckily, I was able to easily scrape the paint leaks off with a knife.

The Hoosier doors before were some type of stained particle board.  I guess that was someone's idea of a makeover.  It wasn't very attractive.  The bottom doors are still stained.  I'd love to cover them up as well, but I think chalkboard paint down low would be overkill.

 I put three coats of chalkboard paint on each door.  Once I took the painters tape off, the door color seemed a bit harsh. 

one door in the process of being conditioned
The directions on the can said to wait three days before using it.  That was the hardest part of the whole project.  Finally, today I conditioned the board for use - you just lay a piece of chalk on its side and rub all over the door.  Erase and then it's ready to use.  Once the doors were conditioned, the color is more of a charcoal gray and looks much better.

The Hoosier was moved to the nook in my foyer several days back during part of the Furniture Shuffle.  It had been in the pantry.  I am now using it as a station for organizing and pricing things for my booth.  I like that the foyer now has a purpose other than a pass-through area.


Here's a view inside the main organizing area - where I get things listed and priced.  Please pardon the wallpaper.  It's at least 15 years old and I thought it was nice at the time.  It's days are numbered.   The metal counter slides out when you need more room - very convenient.

I need chalkboards in at least 3 other places - the office, the kitchen and the loft (my project area).  I already know how I'm going to make that happen in my loft.  I think it will be fabulous, but I'm not even giving a hint about it yet.

Want more chalkboard inspiration?  Check out this chalkboard party at The Stories of A to Z.

Take a look at this post from My Repurposed Life showing how to make your own chalkboard paint.  She made a chalkboard out of a chair bottom!


It's So Very Cheri made a menu chalkboard that's fabulous.


Be sure to check out my Porch and Garden Party.  It's not too late to join in!

I've joined in with the following parties  -
Idid a lot of partying today!!!
Make It Yours Day at My Backyard Eden
Show and Tell at Blue Cricket Designs
Look What I Made at Creations by Kara
Power of Paint at Domestically Speaking
Spotlight Yourself at It's So Very Cheri 
Show Us What You're Workin' With at Me and My Bucket
We're Organized Wednesday at Organize and Decorate Everything
100 Ideas Under $100 at Beyond the Picket Fence
Strut your Stuff at Fireflies and Jelly Beans
Hooking Up With HOH at House of Hepworths
Transformation Thursdays at The Shabby Chic Cottage
Strut Your Stuff Thursday at Somewhat Simple
Thrifty Thursday at Tales from Bloggeritaville   

August 24, 2010

Wooden Ironing Board

Last week I found a fabulous wooden ironing board at an estate sale. I'll call this board #2 because I already have a vintage wooden ironing board (board #1).  What do I use board #1 for?  Ironing. 

My wooden ironing board - in the middle of the floor for some unknown reason

I bought a cute vintage looking cover for board #1 and blogged about it here.

Then I found some great inspiration ideas.  
There's nothing like a little inspiration to get you moving on a project!
There are lots of other uses for these vintage gems besides ironing.

Painted Ironing Board from The Hollow Fencepost

Used as a Potting Bench from  Playing in the Dirt
Used as a Side Table - Craigslist photo found on Flickr
Made into a steel guitar - from AQS Quilt News

Outdoor Wedding Decor from Casa Sugar
Painted Coat Hook from Folk Art By Donna;s Etsy Site
These aren't wood, but what a cute idea - cafe tables - from The Stir
Used as the bar at an outdoor party - from Country Living
Used as the dessert table at a Fall party - from Joyful Weddings and Events
Store Display from Jazzejunqueinc on Flickr
Porch Table  from My Southern Cottage
Painted in Tracey's fav robin's egg blue and Decoupaged at Notes from a Cottage Industry

By this point, I'm feeling inspired. I had been planning to put board #2 up for sale in my booth.  But on second thought, I should keep this and use it as a table in my laundry room!

The first thing to do is remove all the covers.  It turns out, this board had 10 - YES TEN!!! - covers over it.
I forgot to take a picture before I began.  This is when I'm down to the last 2 or 3 layers.

The oldest layers were nailed to the underside of the board. 


An hour or so later, I pulled out the last nail.  Time for the big reveal.  How will the top of the board look?  I hope it's in good shape.  Drum roll please.

Oh my.  Oh me, oh my.  I have a real mix of emotions here.  This is the original sticker that came with the board.  The whole sticker is there.  You just don't see that very often. So why am I also let down?  Because now I don't think I should keep it.  I cannot keep this board and put it out as a table where no doubt a cat or two will sit and damage this sticker.  I considered putting urethane on and using it anyway, but that doesn't seem right.   It's too wonderful to mistreat.  This needs to belong to someone who will appreciate it.  I guess it will be sold.  I am in mourning.  I sure hope the right owner will come along.  I hope some dingbat doesn't get it and rip off the sticker, toss it in the trash and then turn the board into something tacky.  I will likely never meet the owner, so when it sells I'm going to pretend it was bought by someone who will treasure it.

Isn't she a beauty?

 On the other hand, maybe I should urethane the top.  It would keep the sticker forever in place.  The top would be more durable and able to withstand tabletop use.  What do you think?


I have linked to the following parties:
Thrift Share Monday at Apron Thrift Girl
Metamorphosis Monday at Between Naps on the Porch
Show off Your Cottage Monday at The House in Roses

Anything Related at All Thingz Related 
Nifty Thrifty Tuesdays at Coastal Charm
Lucky Linky Tuesday at Lucky Star Lane
Anti-Procrastination Tuesdays at New Nostalgia

Weekly Treasures at Southern Hospitality
Take a Look Tuesday - Sugar Bee - Craft Edition  

Vintage Inspiration Friday - Common Ground

June 24, 2010

Amazing Ideas Out There

Why do I love reading blogs?  Lots of reasons.  But one of the big ones is the amazing ideas I come across.  Lately, I've seen a ton.

Check out this one from Peppertowne.  She turned an out of date coffee table into a fabulous bench.  I've seen these coffee tables at yard sales and just walked right on by.  Forget that.  I want to try this!

Want to see more of this transformation?
She has photos of the whole process.

While you're visiting her site, be sure to check out
how she transformed these bentwood rockers.

I love this painted desk transformation from The Painted Hive.
Keeping the top wood instead of
painting the whole thing really makes it, don't you think?
Before

After

While browsing around her site,
I also came across this chair and stool:

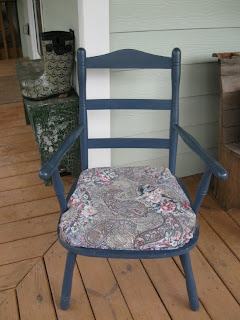
It just so happens that I'm working on a similar chair right now! I wasn't sure how I wanted to do the cushions.  This chair certainly gives me some ideas.  Here's the before on my chair-


I have been flip flopping on whether to do a full out for the house makeover or turn it into a garden chair with a plant sitting in the seat.  There are staple/tack marks all along the edge.  This chair certainly doesn't have the pretty details of the chair from The Painted Hive, but it could be much nicer than when I got it (from a yard sale of course). 

Another idea I'm eager try is adding ruffles to plain t-shirts.  Tea Rose Home has a great tutorial.

Here's another tutorial from Welcome to the Good Life.
So pretty!
I have plenty of t-shirts to cut up, too!


Finally, if you are prepared to just get lost in blogland,
check out this amazing party hosted by My Desert Cottage:

Over 450 bloggers have participated in this party.  The links are in a list on the right side of her blog page.  They are all sharing photos of where they create - just like the magazine.  That's a lot of posts to go through, but they are going to be available for a year.  They'll stay posted on My Desert Cottage for a while and then, she's moving them over to a special blog she created just for that.  Click here for more info.

LinkWithin

Related Posts with Thumbnails